Camper_Larry
RVF Regular
- Joined
- Aug 3, 2026
- Messages
- 16
- Location
- North Carolina
- RV Year
- 2025
- RV Make
- SunLite
- RV Model
- 19RB
- RV Length
- 19 feet
- Fulltimer
- No
So I'll begin our journey by saying my wife likes to put the cart before the horse because she knows I'll never agree to buying the cart in the first place. After she buys the cart I have to figure out the horse, and also the cart, and she just shows up to ride in both....LOL.
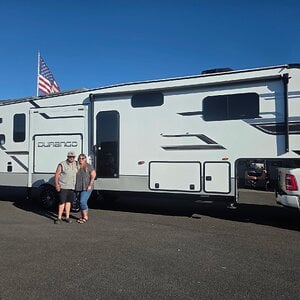
Case in point. The wife wanted a camper so she went out and bought a new 2025 Sunlite 19RB camper back in February. When we show up at the dealer to pick it up, the first thing the salesman says is "What do you plan to tow it with?". My wife points to our 2022 Jeep Wrangler JL and the salesman says "Oh, ummm, well, let me go get the tech guy and ask him". Tech shows up and asks me the tow rating on the Jeep, which is 3,500 lbs with a max tongue weight of 300lbs. FYI, the advertised DRY weight of this camper is 2,900lbs with a tongue weight of 320lbs.
The tech guys says "Well you might be able to tow it with that (Jeep), but the transmission probably isn't up to the task, not to mention you are already exceeding it's tongue weight limit." BTW, I've got a good bit of towing experience so I know the Jeep won't work, but when my wife wants something, she will make the math work. In her mind 3,500lbs is more than 3,000lbs so the Jeep would be fine. Regarding the tongue weight, the Wrangler JL's hitch is mounted to the body (not the frame) so not recommended for use with a WDH. We ended up having a friend tow it home for us with his F-350 and park it in our yard, and there the adventure would begin.
Fortunately we also own a 2003 F-150, which is rated to tow up to 6,200lbs IIRC. Ours is the 4.6L V8, 4R70W 4-Speed transmission, 3.55 LSD, and the tow package with an oil cooler, and transmission cooler. I was pretty sure it would be fine even though my wife calls it our "Hoopty Truck" because I bought it cheap, and it's primary use has been trips to the landfill. It's got 193K on the clock, but even though it's exterior is a little rough, the interior is mint, and it runs great. Besides, for the cost of a newer truck, I can afford to fix a LOT of stuff on a truck I bought for just $1500.
After doing TONS of research via YouTube, forums, and asking friends who've been into it for a while, I started getting the truck and camper ready. I started by making a list of items needed for the camper, which was quite long as there is a LOT of stuff that is needed for water, sewer, and electrical hookups. Fortunately there are almost endless resources for information about campers and RVing on YouTube. I also bought a 3-camera setup, and a TPMS system to keep an eye on the camper tires. It didn't but a couple of manual up/down operations with the manual tongue jack before I bought an electric one. If you plan to run a WDH, the electric tongue jack is almost a necessity IMO.
After I got most of the stuff done on the actual camper, I started upgrading the F-150 since it would be used for towing duty now. I added a set of airbags, news shocks, WDH, and a brake controller. I also changed the transmission and rear diff fluids, and installed a dedicated transmission & water temp gauges to keep an eye on things while towing the camper.
Here's a shot with the truck hooked up prior to getting the airbags and WDH installed. As you can see it's squatted quite a bit and would likely have been riding the bump stops when I hit the first bump if I towed it like that. BTW, I did NOT!

Stay tuned for more....
Case in point. The wife wanted a camper so she went out and bought a new 2025 Sunlite 19RB camper back in February. When we show up at the dealer to pick it up, the first thing the salesman says is "What do you plan to tow it with?". My wife points to our 2022 Jeep Wrangler JL and the salesman says "Oh, ummm, well, let me go get the tech guy and ask him". Tech shows up and asks me the tow rating on the Jeep, which is 3,500 lbs with a max tongue weight of 300lbs. FYI, the advertised DRY weight of this camper is 2,900lbs with a tongue weight of 320lbs.
The tech guys says "Well you might be able to tow it with that (Jeep), but the transmission probably isn't up to the task, not to mention you are already exceeding it's tongue weight limit." BTW, I've got a good bit of towing experience so I know the Jeep won't work, but when my wife wants something, she will make the math work. In her mind 3,500lbs is more than 3,000lbs so the Jeep would be fine.
Regarding the tongue weight, the Wrangler JL's hitch is mounted to the body (not the frame) so not recommended for use with a WDH. We ended up having a friend tow it home for us with his F-350 and park it in our yard, and there the adventure would begin.Fortunately we also own a 2003 F-150, which is rated to tow up to 6,200lbs IIRC. Ours is the 4.6L V8, 4R70W 4-Speed transmission, 3.55 LSD, and the tow package with an oil cooler, and transmission cooler. I was pretty sure it would be fine even though my wife calls it our "Hoopty Truck" because I bought it cheap, and it's primary use has been trips to the landfill. It's got 193K on the clock, but even though it's exterior is a little rough, the interior is mint, and it runs great. Besides, for the cost of a newer truck, I can afford to fix a LOT of stuff on a truck I bought for just $1500.
After doing TONS of research via YouTube, forums, and asking friends who've been into it for a while, I started getting the truck and camper ready. I started by making a list of items needed for the camper, which was quite long as there is a LOT of stuff that is needed for water, sewer, and electrical hookups. Fortunately there are almost endless resources for information about campers and RVing on YouTube. I also bought a 3-camera setup, and a TPMS system to keep an eye on the camper tires. It didn't but a couple of manual up/down operations with the manual tongue jack before I bought an electric one. If you plan to run a WDH, the electric tongue jack is almost a necessity IMO.
After I got most of the stuff done on the actual camper, I started upgrading the F-150 since it would be used for towing duty now. I added a set of airbags, news shocks, WDH, and a brake controller. I also changed the transmission and rear diff fluids, and installed a dedicated transmission & water temp gauges to keep an eye on things while towing the camper.
Here's a shot with the truck hooked up prior to getting the airbags and WDH installed. As you can see it's squatted quite a bit and would likely have been riding the bump stops when I hit the first bump if I towed it like that. BTW, I did NOT!
Stay tuned for more....