Bob K4TAX
RVF Expert
- Joined
- Mar 13, 2021
- Messages
- 613
- Location
- Tennessee
- RV Year
- 2016
- RV Make
- Forest River
- RV Model
- Wildwood XL 253 RLXL
- RV Length
- 25 ft or so
- TOW/TOAD
- Chev 2011 Silverado Crew Cab LTZ
- Fulltimer
- No
In part of my maintenance routine and first time winterizing this trailer, I ran across the water heater anode rod. This trailer is a 2016 model, purchased used by us. As to its maintenance history, that is basically unknown. We are the 3rd owner.
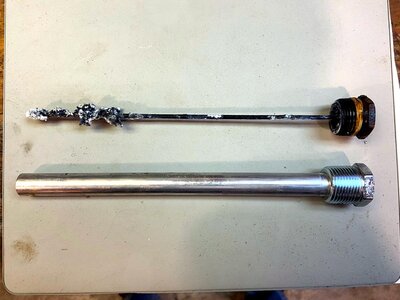
Anyway, I wanted to drain the water heater, and to do so requires removing the anode rod. This requires a 1 1/16" socket. When the anode rod was removed the water gushed out along with a significant amount of white chalky-looking material. I presume this was lime that leached out of the water during the heating process.
The attached picture is of the old anode rod and the new anode rod. You can figure out which is which. Needless to say the old rod had been consumed. I used a long nozzle on my air hose to blow out the heater and remove as much of the white chalky-looking material as possable. I'd estimate at least 2 cups were removed. I then flushed out the heater with more water, all through the opening for the anode rod. Once I was satisfied that I had removed as much residue and water as possible, I installed the new anode rod. I did use Teflon tape on the threads to assure a good seal. It is all dry, new anode rod in place, and ready for next Spring camping. I also blew out the water lines with my air compressor at 40PSI and connected to the city water inlet. Once I was satisfied all the lines were void of water, I left the system pressurized with 40PSI of air.