Welcome to RVForums.com

  • Register now and join the discussion
  • Friendliest RV Community on the web
  • Modern site for PC's, Phones, Tablets - no 3rd party apps required
  • Ask questions, help others, review campgrounds
  • Get the most out of the RV Lifestyle
  • Invite everyone to RVForums.com and let's have fun
  • Commercial/Vendors welcome

MOD Replacing Headlamp Assemblies in a 2017 Newmar Ventana Motorhome

Welcome to RVForums.com

  • Register now and join the discussion
  • Modern secure site, no 3rd party apps required
  • Invite your friends and let's have fun
  • Commercial/Vendors welcome
  • Friendliest RV community on the web

Neal

Staff member
RVF Administrator
Joined
Jul 27, 2019
Messages
11,568
Location
Midlothian, VA
RV Year
2017
RV Make
Newmar
RV Model
Ventana 4037
RV Length
40' 10"
Chassis
Freightliner XCR
Engine
Cummins 400 HP
TOW/TOAD
2017 Chevy Colorado
Fulltimer
No
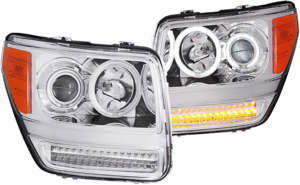
Yesterday I received Anzo USA 111144 Dodge Nitro G2 Projector Halo Chrome Clear Amber Headlight Assembly that someone else found somewhere and I had it saved to my cart for a long time. They are Dodge Nitro headlamps which apparently and seemingly is what is used in my 2017 Newmar Ventana. I paid $225 for the pair via Amazon Prime, the price seems to have jumped up again. I did a little searching on YouTube (my favorite training resource) on how to replace headlights but looks like this is going to be some learning yet again. If anyone knows how to remove headlamps chime in as that's why I'm starting this thread BEFORE I proceed.

It appears like the correct replacement and it appears that Newmar has a chrome trim that goes over the headlamp the same fit as in this one. So I need to figure out such as using a pry tool to carefully get the chrome fascia off and then remove the headlamp assembly, and then install the new one.

With that said those of you vehicle experts that have any tips before I do this please let me know your tips and suggestions on how to change out these headlights. I hope to get to this over the next few days as they are bulky and need to get them installed sooner than later.
headlights.png
 
Do you just cross reference the number embossed on the headlight to see what automobile they are from? I envision wanting to do the same at some point with my NADP.
 
Do you just cross reference the number embossed on the headlight to see what automobile they are from?

That's what I've heard or you cross reference what someone else tells you works :)
 
I see a lot of us use Amazon...but for cheap tools, you can’t beat Harbor Freight. I would not buy a tool from them that required precision, e.g. band saw, no, belt sander, yes. Sign up for their emails, and you’ll receive 20% off coupons regularly, along with free items you can get with a purchase. I can’t tell you how many free flashlights, microfiber towels, screwdrivers I’ve gotten from them over the years. There is one dangerously close to my house. The reason I bring this up, is that this link might help you with your headlight project.

https://www.harborfreight.com/automotive/auto-body-trim/trim-and-molding-tool-set-5-pc-64126.html
 
Thanks. I do have a pry tool set I got for getting the bezel off of my dash radio and plan on trying those first.
 
This afternoon I replaced the headlamps. I'll have pictures tomorrow as it's now dark and I have some tidying up to do but I'll document the process while it's still in an active brain cell, one of few remaining:

Overall it's a simple task but as with anything automotive the getting the part in and out is a little bit of a puzzle. As usual Newmar puts some of their "engineering" in place modifying the traditional replacement with the shoe horn into a coach method.

Unplug the main bulb and the lower bulb. There is actually a 3rd on the side of the assembly you'll find but you can't really unplug it easily so wait for the assembly to be removed. Either label the plugs as I did for main and lower or realize they are color coded, my main bulb connector is gray, lower is black. There are two bolts holding the assembly at the top, remove those. There is one at the upper side at the sidewall, remove the nut from that. Finally there is one at bottom center, remove the nut. The assembly is now free to be removed. Not hard!

Take the assembly to your picnic table aka bench and you'll see that it's easy to remove the chrome fascia, just pry off of one side and it hooks onto the other side. No sweat.

Remove the bottom screw thing (aft lower center) and install the one Newmar had in the old assembly as it adds threads for a nut to go on the back side to secure it when installed. Install the upper outside bolt setup and then install the Chrome fascia. The assembly is now ready to be installed into the coach. You'll notice on this particular headlamp there is an additional 12V wire pair (red/black) which is for the led light around the main bulbs. You'll want to use scotch connectors or splice into the wire pair going to the 3rd side connector mentioned above which is 12V - brown is ground so connect black to brown and red to white.

Getting the headlamps back in is a bit of a challenge but you can do it. Be careful of scratching paint or chrome while maneuvering it in so I recommend putting blue painters tape around the perimeter of the location where you'll be installing the headlamp.

First assembly took me an hour as I had to solve the puzzle. Other assembly was 20-30 minutes as I struggled a bit getting it back in and lined up.

Initial CG parking lot tests look good. It will be interesting to see how close these are to being aimed.

In summary, super easy, seems well worth it with actual projectors and halogen bulbs. Looking forward to test driving at some point but they are not yellow crap lights, they are very nice!! Pics to follow but it looks nearly identical to the originals other than the different projectors and new LED lighting in these for the marker lights, turn signal, etc.

The web site that offers this unit is:

http://www.anzousa.com/dodge-nitro-07-11-projector-h-l-g2-halo-chrome-clear-amber-w-led-ccfl.html
 
Last edited:
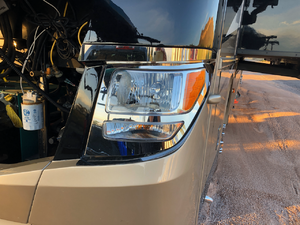
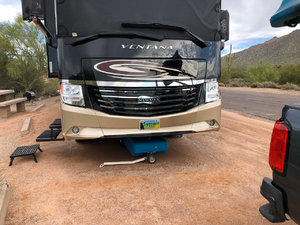
Mission complete. Pics of old assembly vs. new. Not hard, next test is a drive at some point and checking aim. Click images (thumbnails) for full size view.

old.png
new.png
 
Since replacing the headlamp assemblies in my 2017 Newmar Ventana I finally had a chance to drive in the dark with them. Twice actually, briefly in the evening and then for about an hour when departing a CG before sunrise the other day.

The main lesson learned is that if you replace headlamp assemblies you MUST, I say again MUST, aim them. After googling how to aim headlights and watching YouTube they mention the same thing and I learned this lesson. The left/driver's side seemed a little low but lighting was good, I think the right side was spotting aircraft! Okay, it was high. Initially I wasn't sure how this compared to what I used last (beamtech LED bulbs) but now that I have them aimed, at least crudely I really like them. The projector lights definitely make a difference and they project the light much farther. The biggest difference is the high beams. With the beamtech there was little to no change between normal and high beam as it's the same bulb whereas this new assembly I installed has two separate projectors with the high beam being much larger lights.

I think the difference is minimal at low beam when using the beamtech lights that I used before the change out, the beamtech's are very very nice. Not sure if they're legal but I could see better. I think the projectors in the new assembly will give me more distant lighting, I have yet to drive it with them aimed so I'll have to check that another day but at the CG where I made the adjustments I'm pleased. I recommend at the minimum treating yourself to beamtech's and if you're serious about better headlights consider the headlamps posted in this thread. For those interested in the beamtech's I used previously here is the link:

https://www.amazon.com/gp/product/B06XHCQ8KY/?tag=rvf01-20
Thanks for doing the leg work Neal, just put them in, it's like night and day (pun intended)!(y)
 

Latest posts

Latest resources

Back
Top