MarkMaxPayne
RVF Supporter
- Joined
- May 24, 2023
- Messages
- 353
- Location
- Beaverton, OR
- RV Year
- 2013
- RV Make
- Newmar
- RV Model
- New Aire 3543
- RV Length
- 36'
- Chassis
- Spartan
- TOW/TOAD
- Fiat 500 Turbo
- Fulltimer
- No
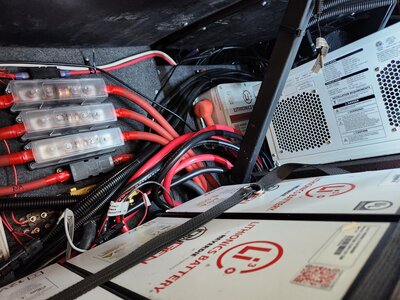
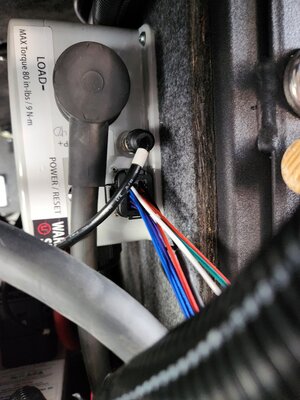
This weekend was hopefully the last I'll have to empty my storage bay to crawl inside to reach way behind my Xantrex inverters to press the Power/Reset button on my Lithionics BMS, which is mounted on the back wall of the bay. After my rig was built (I have a 2023 Newmar New Aire 3543 that was built ~ Oct '22) Newmar relocated the BMS to a more access friendly location on the left of the battery bay wall (towards the front of the rig) vs. burying it. However, relocating the BMS and redoing my battery bay layout seemed like too heavy of a lift. After seeing that newer coaches (24 & 25 models) were being shipped with a remote Lithioncs Power/Reset button up in the over the dash electrical compartment, I did some research to see if it is also an option for older coach. The answer is "yes" if your Lithionics BMS is of a model/version that supports it.
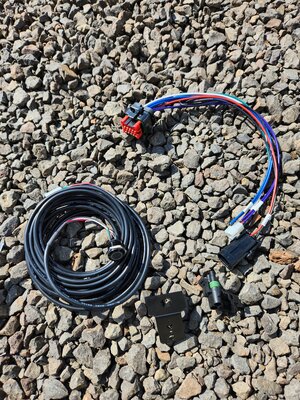
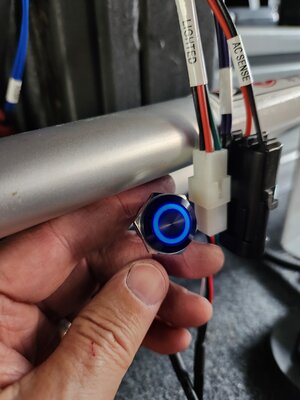
First things first... I visited many web properties to pull up fact sheets on my Lithionics BMS. I found on the Lithionics site a data sheet that showed the AMPseal-23 pin connector with its complete pin-out diagram. I noted that my factory harness connected to this socket only had 2 wires coming out of it and according to the diagram that was for what they call AC Sense. All other pins were empty, with no wires attached. However, the BMS pin-out diagram did list pins for a remote power/reset switch. After reaching out to a few sources to try to get answers (Newmar, Lithionics, etc.), I found a Lithionics dealer who was quite helpful, Master Overland (The Nation's Best Camper Van and Overland Vehicle Parts Superstore). After verifying my Lithionics BMS model # and serial # they confirmed that my BMS did indeed support this feature and that all I would need would be a Lithionics V9 AMPseal 75-H3-EBR harness (Lithionics V9 AMPseal 75-H3-EBR harness 14 pin ampseal with ac sense and light reset) to replace the harness the factory connected to the BMS and then a Lithionics 75-240-180 Illuminated Remote Power Switch (Lithionics 75-240-180 Illuminated Remote Power Switch). Because the AC Sense connector was different on this harness than the factory supplied harness I also order a weatherproof connector set to plug into connector already supplied on the new harness (Amazon.com) and then a bracket for mounting my switch (Amazon.com).
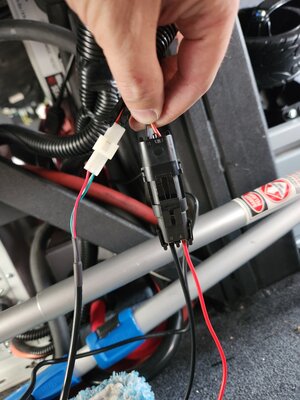
I killed the circuit breakers for the chassis batteries, emptied the storage bay behind the Xantrax inverter rack, crawled in while laying on my back, reached up and behind the inverters, and pushed and held the BMS Power/Rest button for what I hoped would be one last time. I then removed the factory supplied AMPSeal connector that only supported AC Sense.
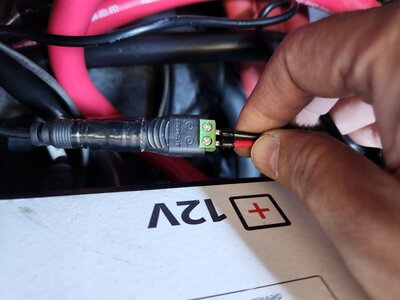
The first part of the project was dealing with the AC Sense connection. From the factory (on my rig at least) they took what looks like a laptop power brick, plugged that into a 120V socket behind the batteries, and then used a female DC power jack connector to hook up their factory harness to (Amazon.com). I decided to unscrew those two terminals to free up the factory harness and to fashion a quick adaptor cord reusing that DC Power jack connector, a couple of wires, a couple of wire ferrules, and a male weatherproof connector (Amazon.com). That handled the AC Sense side of things. Now I was as good as factory functionality.
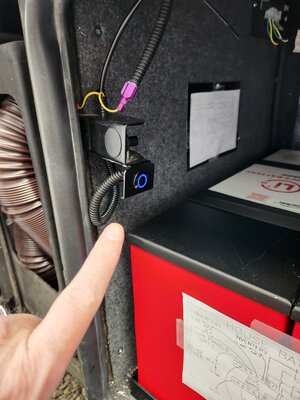
For the remote push button I simply plugged that long cable's square 4 pin connector into the new harness. As much as I would LOVE to put this up in the electronics cabinet over the dash like the factory does now, I wasn't of the mindset to do long cable runs and pulls. That, and I'd have to greatly extend the cable. Instead I located my switch up in the same bay as the Lithionics batteries. I mounted up front where it would be very easy to access, mounting my mounting bracket to the bracket the factory used for the door open/closed sensor mount. I can always move it later, but at least I wasn't going to be doing my basement bay gymnastics anymore to turn my lithium batteries on and off or to reset the BMS.
In all the mod cost me about $250 and looks almost like factory. If I ever wanted to go back to original I could simply swap the BMS AMPSeal harnesses and reattach the AC Sense wires to the DC Power Jack connector. Could this be done a lot cheaper? Heck YES! One could obtain a pin kit online fairly cheaply and add the required pins to the existing AMPSeal connector. The illuminated switch (a CIT BH16NBBBB) runs about $10 online. All in with some wire? Perhaps under $30 if you feel really comfortable with repining connectors, reading pin-out diagrams, soldering wires. That all said, I just felt better going with OEM factory parts from a reputable dealer vs. trying to roll my own while crossing my fingers I didn't mess things up somehow.
I hope this helps anybody else frustrated by early factory installations of the Lithionics batteries and BMS by Newmar. To their credit, each model year the placement of the components and the added remote switch did get better and better as they listened to customer and dealer feedback.
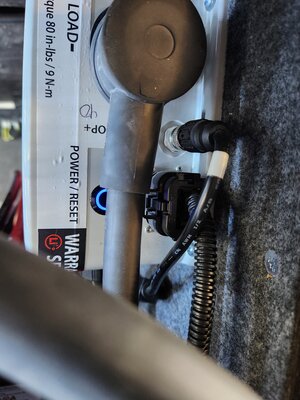
Pics... 1st 2 is the crappy placement of the BMS and the Power/Reset switch; 3rd is the parts used; 4, 5, 6 is hooking up the AC Sense wires; 7th is plugging in the new AMPSeal connector; 8th is a test that it'll work; 9th is temp/final install location of the new remote switch.
Best,
-Mark
First things first... I visited many web properties to pull up fact sheets on my Lithionics BMS. I found on the Lithionics site a data sheet that showed the AMPseal-23 pin connector with its complete pin-out diagram. I noted that my factory harness connected to this socket only had 2 wires coming out of it and according to the diagram that was for what they call AC Sense. All other pins were empty, with no wires attached. However, the BMS pin-out diagram did list pins for a remote power/reset switch. After reaching out to a few sources to try to get answers (Newmar, Lithionics, etc.), I found a Lithionics dealer who was quite helpful, Master Overland (The Nation's Best Camper Van and Overland Vehicle Parts Superstore). After verifying my Lithionics BMS model # and serial # they confirmed that my BMS did indeed support this feature and that all I would need would be a Lithionics V9 AMPseal 75-H3-EBR harness (Lithionics V9 AMPseal 75-H3-EBR harness 14 pin ampseal with ac sense and light reset) to replace the harness the factory connected to the BMS and then a Lithionics 75-240-180 Illuminated Remote Power Switch (Lithionics 75-240-180 Illuminated Remote Power Switch). Because the AC Sense connector was different on this harness than the factory supplied harness I also order a weatherproof connector set to plug into connector already supplied on the new harness (Amazon.com) and then a bracket for mounting my switch (Amazon.com).
I killed the circuit breakers for the chassis batteries, emptied the storage bay behind the Xantrax inverter rack, crawled in while laying on my back, reached up and behind the inverters, and pushed and held the BMS Power/Rest button for what I hoped would be one last time. I then removed the factory supplied AMPSeal connector that only supported AC Sense.
The first part of the project was dealing with the AC Sense connection. From the factory (on my rig at least) they took what looks like a laptop power brick, plugged that into a 120V socket behind the batteries, and then used a female DC power jack connector to hook up their factory harness to (Amazon.com). I decided to unscrew those two terminals to free up the factory harness and to fashion a quick adaptor cord reusing that DC Power jack connector, a couple of wires, a couple of wire ferrules, and a male weatherproof connector (Amazon.com). That handled the AC Sense side of things. Now I was as good as factory functionality.
For the remote push button I simply plugged that long cable's square 4 pin connector into the new harness. As much as I would LOVE to put this up in the electronics cabinet over the dash like the factory does now, I wasn't of the mindset to do long cable runs and pulls. That, and I'd have to greatly extend the cable. Instead I located my switch up in the same bay as the Lithionics batteries. I mounted up front where it would be very easy to access, mounting my mounting bracket to the bracket the factory used for the door open/closed sensor mount. I can always move it later, but at least I wasn't going to be doing my basement bay gymnastics anymore to turn my lithium batteries on and off or to reset the BMS.
In all the mod cost me about $250 and looks almost like factory. If I ever wanted to go back to original I could simply swap the BMS AMPSeal harnesses and reattach the AC Sense wires to the DC Power Jack connector. Could this be done a lot cheaper? Heck YES! One could obtain a pin kit online fairly cheaply and add the required pins to the existing AMPSeal connector. The illuminated switch (a CIT BH16NBBBB) runs about $10 online. All in with some wire? Perhaps under $30 if you feel really comfortable with repining connectors, reading pin-out diagrams, soldering wires. That all said, I just felt better going with OEM factory parts from a reputable dealer vs. trying to roll my own while crossing my fingers I didn't mess things up somehow.
I hope this helps anybody else frustrated by early factory installations of the Lithionics batteries and BMS by Newmar. To their credit, each model year the placement of the components and the added remote switch did get better and better as they listened to customer and dealer feedback.
Pics... 1st 2 is the crappy placement of the BMS and the Power/Reset switch; 3rd is the parts used; 4, 5, 6 is hooking up the AC Sense wires; 7th is plugging in the new AMPSeal connector; 8th is a test that it'll work; 9th is temp/final install location of the new remote switch.
Best,
-Mark
Attachments
-
 20240825_111437.jpg3.4 MB · Views: 50
 -
 20240825_111628.jpg1.5 MB · Views: 56
 -
 20240825_111202.jpg3.3 MB · Views: 44
 -
 20240825_112333.jpg983 KB · Views: 33
 -
 20240825_125914.jpg3.8 MB · Views: 38
 -
 20240825_125951.jpg1.3 MB · Views: 57
 -
 20240825_123539.jpg1.4 MB · Views: 64
 -
 20240825_123552.jpg1.1 MB · Views: 27
 -
 20240825_135403.jpg1.3 MB · Views: 51


