VTPete
RVF Supporter
- Joined
- Jan 26, 2020
- Messages
- 280
- Location
- Lakeside, CA
- RV Year
- 2017
- RV Make
- Newmar
- RV Model
- Ventana LE
- RV Length
- 40
- TOW/TOAD
- Ford F150 King Ranch
- Fulltimer
- No
Thought I'd post my experience cleaning reworking my battery bay in case it's a helpful reference to others in the future. I've noticed it mentioned by other Class A owners many times in the past-so I think it's a common challenge.
It's been an embarrassment for me for quite awhile, but I was waiting for the right time to tackle what I know would be a big project. I ended up taking about 8 hours on this, including a run down to the hardware store and the battery dealer, (with a stop for a yummy breakfast burrito that served as brunch).
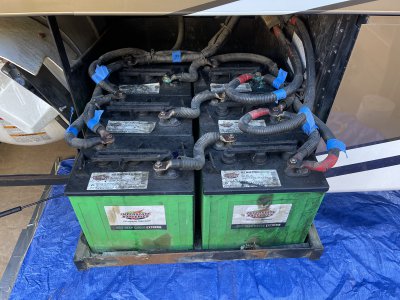
A little background; at some point (I think when the dealer sent me home with the coach in Oct 2017), the charge settings on my Magnum ME-RC50 were set way too high, I was charging at like 100%. As a result the batteries were boiling over and making a mess of the compartment. I noticed bulging on a few of the batteries, and the retaining straps were destroyed. The batteries still performed marginally but I only boondocked occasionally so it wasn't critical. I was fortunate to run across @redbaron's excellent "Simple Guide to Battery life" back in summer 2019, and was finally able to get my charge settings corrected back then. Since then no more boil overs, but still had the mess to contend with.
To get ready for the project I picked up some POR-15, I got the starter kit at Amazon. This starter kit covers a lot of surface area, I'd also previously used it to do my basement door gas struts and connecting hardware, as they'd been showing corrosion. The rest I was able to use for the battery bay, slide out tray, and some of the propane tank area. I also has a battery strap, a good wire brush attachment for my drill, a quality face mask for cleanup and painting, and a good price for replacement batteries. I chose to go with lead acid again for a couple reasons, one is the price, and the other is AGM don't charge in below freezing weather. We travel in winter weather annually for some ski vacations. I went with Trojan T-105's as they were the best value I could pick up locally at $125 ea. I looked around for some silicon tape in black and red to redo the wrapping on the ends but no one carried locally, so I kept what I had. They cleaned up ok with some mild degreaser and water.
Prior to removing the batteries I turned off the inverter charger and the the salesman switch at the door. I was unplugged from shore power. I took pictures and did a written diagram of the wiring, and numbered most of the connections. I then put the numbering on masking tape attached to the various cables.
Magnum says to disconnect the lead coming from the inverter first, and reconnect it last, so I first disconnected the lead at the 300A fuse on the wall of the battery bay, then disconnected the other end at the battery and set it aside. I then proceeded to cut the tie downs attaching the various leads to the batteries and then disconnected the rest of the cabling. I put the cabling aside to clean it up. I removed the batteries to take them as trade-in's later in the day. I cleaned all the cable connections thoroughly, a few had mild corrosion which I addressed with the wire brush. All were greasy from the battery terminal protectant I use periodically, so this took a bit of work to clean them all up to like new condition.
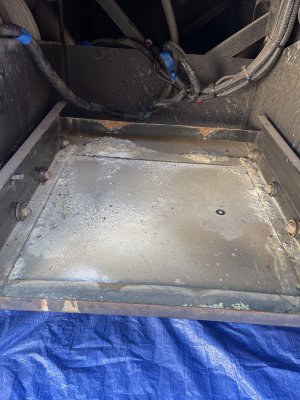
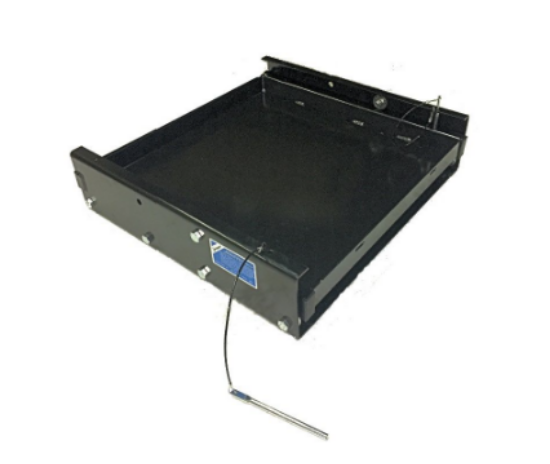
I then used my shop vac to clean out the tray and the area below. The tray in my rig has a single removable roller above the tray on each side. By removing the bolts for these rollers, the rollers themselves came off, and the tray can then clear the stops and slides right out. I had a huge volume of material under there from the boil overs! Critical to wear that high quality painting mask for this step. After the shop vac, I sprayed a solution of baking soda and water then wiped up. Then I rinsed with water and dried. I also soaked the cables with the baking soda solution as well. I then spent a lot of time with the wire brush attachment for my drill working the corroded and rusted areas. The tray itself was pitted and very corroded... the tray did not turn out perfect, but I didn't care too much about appearance for the areas under the batteries.
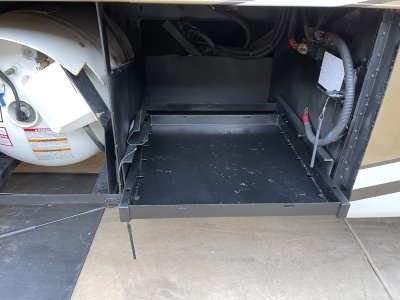
I was then ready to apply the POR-15 rust prevention paint. First you have to spray their degreaser, then rinse and let dry, then the metal cleaner, and rinse and dry. I did this to the entire compartment and the tray itself. Then I was ready to apply the POR-15 paint. I did both sides of the tray and the compartment with it, but went very light on the non rusted areas, but kept it thicker where things were bad. One must be sure to wear good gloves along with the mask for this! I had work gloves and some of it soaked thru and stained my fingers, so I'd suggest rubber gloves. The POR-15 takes a good bit of time to dry, so I ran down to get my batteries while waiting.
I came back and then put another coat of paint on everything, using Rustoleum flat black paint and primer. The POR-15 Black paint is pretty glossy, so a top coat of flat black looks much better.
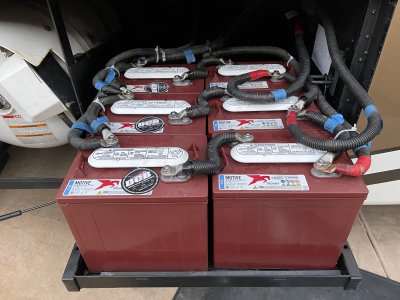
Lastly, I put the tray back in and the new batteries, then reinstalled the various wiring items, connecting the 300A fuse connection last. I zip tied the cables as before, but only had white zip ties, I wish I'd had black! I have replacement straps on order that will be installed in a few days. I turned the coach back on at the RC50 control panel and salesmen switch, and everything came up happy. I checked my charge settings and they were as before, I run the charger at 40%. The batteries were showing about 12.4 at first. The next day I ran the charger and was satisfied the bulk charging wasn't hitting the batteries too hard. All works well.
Here's a few before and after photos.
It's been an embarrassment for me for quite awhile, but I was waiting for the right time to tackle what I know would be a big project. I ended up taking about 8 hours on this, including a run down to the hardware store and the battery dealer, (with a stop for a yummy breakfast burrito that served as brunch).
A little background; at some point (I think when the dealer sent me home with the coach in Oct 2017), the charge settings on my Magnum ME-RC50 were set way too high, I was charging at like 100%. As a result the batteries were boiling over and making a mess of the compartment. I noticed bulging on a few of the batteries, and the retaining straps were destroyed. The batteries still performed marginally but I only boondocked occasionally so it wasn't critical. I was fortunate to run across @redbaron's excellent "Simple Guide to Battery life" back in summer 2019, and was finally able to get my charge settings corrected back then. Since then no more boil overs, but still had the mess to contend with.
To get ready for the project I picked up some POR-15, I got the starter kit at Amazon. This starter kit covers a lot of surface area, I'd also previously used it to do my basement door gas struts and connecting hardware, as they'd been showing corrosion. The rest I was able to use for the battery bay, slide out tray, and some of the propane tank area. I also has a battery strap, a good wire brush attachment for my drill, a quality face mask for cleanup and painting, and a good price for replacement batteries. I chose to go with lead acid again for a couple reasons, one is the price, and the other is AGM don't charge in below freezing weather. We travel in winter weather annually for some ski vacations. I went with Trojan T-105's as they were the best value I could pick up locally at $125 ea. I looked around for some silicon tape in black and red to redo the wrapping on the ends but no one carried locally, so I kept what I had. They cleaned up ok with some mild degreaser and water.
Prior to removing the batteries I turned off the inverter charger and the the salesman switch at the door. I was unplugged from shore power. I took pictures and did a written diagram of the wiring, and numbered most of the connections. I then put the numbering on masking tape attached to the various cables.
Magnum says to disconnect the lead coming from the inverter first, and reconnect it last, so I first disconnected the lead at the 300A fuse on the wall of the battery bay, then disconnected the other end at the battery and set it aside. I then proceeded to cut the tie downs attaching the various leads to the batteries and then disconnected the rest of the cabling. I put the cabling aside to clean it up. I removed the batteries to take them as trade-in's later in the day. I cleaned all the cable connections thoroughly, a few had mild corrosion which I addressed with the wire brush. All were greasy from the battery terminal protectant I use periodically, so this took a bit of work to clean them all up to like new condition.
I then used my shop vac to clean out the tray and the area below. The tray in my rig has a single removable roller above the tray on each side. By removing the bolts for these rollers, the rollers themselves came off, and the tray can then clear the stops and slides right out. I had a huge volume of material under there from the boil overs! Critical to wear that high quality painting mask for this step. After the shop vac, I sprayed a solution of baking soda and water then wiped up. Then I rinsed with water and dried. I also soaked the cables with the baking soda solution as well. I then spent a lot of time with the wire brush attachment for my drill working the corroded and rusted areas. The tray itself was pitted and very corroded... the tray did not turn out perfect, but I didn't care too much about appearance for the areas under the batteries.
I was then ready to apply the POR-15 rust prevention paint. First you have to spray their degreaser, then rinse and let dry, then the metal cleaner, and rinse and dry. I did this to the entire compartment and the tray itself. Then I was ready to apply the POR-15 paint. I did both sides of the tray and the compartment with it, but went very light on the non rusted areas, but kept it thicker where things were bad. One must be sure to wear good gloves along with the mask for this! I had work gloves and some of it soaked thru and stained my fingers, so I'd suggest rubber gloves. The POR-15 takes a good bit of time to dry, so I ran down to get my batteries while waiting.
I came back and then put another coat of paint on everything, using Rustoleum flat black paint and primer. The POR-15 Black paint is pretty glossy, so a top coat of flat black looks much better.
Lastly, I put the tray back in and the new batteries, then reinstalled the various wiring items, connecting the 300A fuse connection last. I zip tied the cables as before, but only had white zip ties, I wish I'd had black! I have replacement straps on order that will be installed in a few days. I turned the coach back on at the RC50 control panel and salesmen switch, and everything came up happy. I checked my charge settings and they were as before, I run the charger at 40%. The batteries were showing about 12.4 at first. The next day I ran the charger and was satisfied the bulk charging wasn't hitting the batteries too hard. All works well.
Here's a few before and after photos.