It is a good idea to be able to identify the raised symbols on the battery casing. They are labeled to identify the polarity Plus +, or Minus - . When you see jumpers attached between “+” and “-“…that is a series connection. It adds the voltage, but keeps the amp hours the same. If you see jumpers attached between “+” and “+” …and also “-“ and “-“…that is a parallel connection. Parallel connections keep the voltage the same, but add amp hours.
Newmar wires the eight battery bank using eight 6v batteries. They are trying to achieve a 12v system to be compatible with your coaches normal dc voltage. So, they take two batteries and series connect them. They are 6v (6.4v) and 210 aH generally. So in series…this yields 12v (12.8v) and 210 aH.
Next they replicate this three more times…and connect the four sets in parallel. Connecting positives to each other and negatives to each other. This keeps the voltage at 12v (12.8v)…but gives you more amp hours 4 x 210aH = 840 aH.
Don’t worry…the first time you deal with these things…it is overwhelming to the eyes. Complete chaos going in with all of those cables. Take your time…and start with identifying the positive and negative terminals. Get an overall picture of how they are organized. Then take one step at a time… Identify the short jumper cables between just two batteries…nothing else on those terminals. That is your series connections turning two 6v into a pseudo 12v. Then identify the slightly longer jumpers going between like terminals…this are your parallel.
It is important to be able to identify these…so that you can get them filtered out.
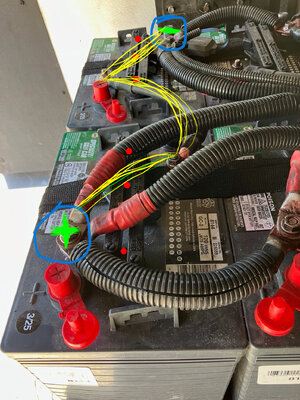
The final steep is to identify the actual connections to the coach.
Generally…there are three sets of connections. You will have a plus and a minus..and they will connect to those blue circled ends of a pair of batteries. Or at opposite ends of the four sets. One positive and one negative.
The devices connected are
1) Inverter
2) House Distribution
3) Bi-directional relay
Note: the negative for the bi-directional relay is bolted to the frame rail…instead of running a cable the entire length of the coach.
Again…it can be daunting..,but once you do this, it will be much easier to understand what is going in. Very useful in troubleshooting..and super important if you decide to replace your batteries, or pull them for routine maintenance of the bay.