MarkMaxPayne
RVF Supporter
- Joined
- May 24, 2023
- Messages
- 318
- Location
- Beaverton, OR
- RV Year
- 2013
- RV Make
- Newmar
- RV Model
- New Aire 3543
- RV Length
- 36'
- Chassis
- Spartan
- TOW/TOAD
- Fiat 500 Turbo
- Fulltimer
- No
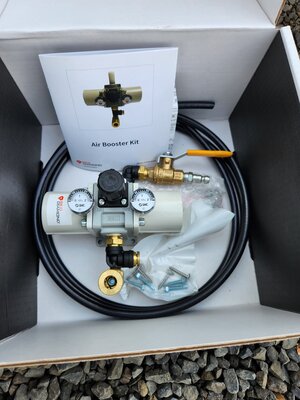
One of my projects this weekend was the installation of Spartan's Red Diamond Air Booster on my 2023 Newmar New Aire on the K2 Chassis (although it works on any chassis). Air Booster – Red Diamond Parts
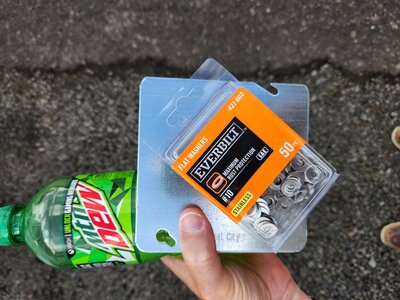
The day started with a trip to Home Depot for a steel plate, a pack of 50 stainless steel washers, and a motivational beverage.
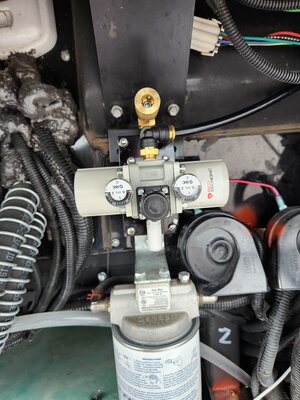
On my rig the best place to mount was in the front cap in a gap over a filter, the weak chassis horns, over the generator. First thing I had to do was reroute the sensor wire harness and fluid delivery tube for my windshield wiper tank. Both ran through my desired mounting space, but we're long enough to reroute to the other side of the fluid container, over by the air horns. Their original location would have also interfered with the device's supplied quick connect and shutoff valve. I disconnected them from the fluid container, rerouted, and reconnected.
Next I took a grinder and cut down my steel plate (a thick 4" electrical box cover) to a size just larger than the mounting holes of the air pump. Some quick drying black rust prevention paint applied, I then used self tapping screws to mount the device to my makeshift plate.
The plate itself mounted to the bottom of a bracket that was already there and the bottom of a sheet of metal that the bracket for the oil filter and horns were screwed into at about the same height. I mounted the device upside down (instructions says that is okay) as to clear the horns. The top of the bracket was screwed into the bottom of the metal brace already there and the bottom I spaced off with 25 washers on each bottom screw. Yes, I should have used a proper spacer or brushing from the likes of Ace Hardware, but I can always replace later. I did this so the mounting bracket would end up vertical vs at an angle.
Once the air pressure doubler was mounted I routed the ample length air tube that came with the kit a similar route of up and around like I did the washer fluid sensor wires and tube. Push connections made final hookup very easy.
Last thing was to hook up my 50' hose and air tool, turn on the engine, let the air build up to final pressure, open the provided air valve, and then use the device's built in adjustment knob to set the output side to the PSI I wanted (input was reading about 140PSI and I set the output to 200PSI).
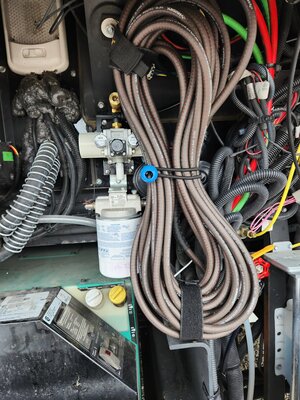
The device is like a compressor, but it uses the input air pressure to run its pump to then increase the output pressure of the same air. The newly installed device made quick work of topping off my tires. Normally the last 5 to 10 lbs of air takes forever, but this device made quick work of it. When finished I turned off the air at the newly provided/installed shutoff valve.
I store my air hose up front in the same area using 2 magnetic velcro straps where one is stuck to the chassis frame rail and the other to a metal bracket (Amazon). My air tools are in a small tote on the floor of the front driver's electrical bay, below the level of any electronic boards or wires.
I must say this was an easy DIY project and the device works as advertised. So far I am pretty happy with it. The hardest part was locating a good place for it and making my own mounting bracket.
Best,
-Mark
The day started with a trip to Home Depot for a steel plate, a pack of 50 stainless steel washers, and a motivational beverage.
On my rig the best place to mount was in the front cap in a gap over a filter, the weak chassis horns, over the generator. First thing I had to do was reroute the sensor wire harness and fluid delivery tube for my windshield wiper tank. Both ran through my desired mounting space, but we're long enough to reroute to the other side of the fluid container, over by the air horns. Their original location would have also interfered with the device's supplied quick connect and shutoff valve. I disconnected them from the fluid container, rerouted, and reconnected.
Next I took a grinder and cut down my steel plate (a thick 4" electrical box cover) to a size just larger than the mounting holes of the air pump. Some quick drying black rust prevention paint applied, I then used self tapping screws to mount the device to my makeshift plate.
The plate itself mounted to the bottom of a bracket that was already there and the bottom of a sheet of metal that the bracket for the oil filter and horns were screwed into at about the same height. I mounted the device upside down (instructions says that is okay) as to clear the horns. The top of the bracket was screwed into the bottom of the metal brace already there and the bottom I spaced off with 25 washers on each bottom screw. Yes, I should have used a proper spacer or brushing from the likes of Ace Hardware, but I can always replace later. I did this so the mounting bracket would end up vertical vs at an angle.
Once the air pressure doubler was mounted I routed the ample length air tube that came with the kit a similar route of up and around like I did the washer fluid sensor wires and tube. Push connections made final hookup very easy.
Last thing was to hook up my 50' hose and air tool, turn on the engine, let the air build up to final pressure, open the provided air valve, and then use the device's built in adjustment knob to set the output side to the PSI I wanted (input was reading about 140PSI and I set the output to 200PSI).
The device is like a compressor, but it uses the input air pressure to run its pump to then increase the output pressure of the same air. The newly installed device made quick work of topping off my tires. Normally the last 5 to 10 lbs of air takes forever, but this device made quick work of it. When finished I turned off the air at the newly provided/installed shutoff valve.
I store my air hose up front in the same area using 2 magnetic velcro straps where one is stuck to the chassis frame rail and the other to a metal bracket (Amazon). My air tools are in a small tote on the floor of the front driver's electrical bay, below the level of any electronic boards or wires.
I must say this was an easy DIY project and the device works as advertised. So far I am pretty happy with it. The hardest part was locating a good place for it and making my own mounting bracket.
Best,
-Mark