Neal
Administrator
- Joined
- Jul 27, 2019
- Messages
- 14,002
- Location
- Midlothian, VA
- RV Year
- 2017
- RV Make
- Newmar
- RV Model
- Ventana 4037
- RV Length
- 40' 10"
- Chassis
- Freightliner XCR
- Engine
- Cummins 400 HP
- TOW/TOAD
- 2017 Chevy Colorado
- Fulltimer
- No
This past winter I took on a major project to install Drainmaster electric gate valves. In that process I also installed SeeLevel tank monitor strips in the proper locations on the wet bay side vs. pegboard side. I want to document what I learned and help others in what it required to remove a wet bay panel in a Newmar motorhome. I do not have experience or have viewed what the highline wet bay panels look like and what's involved as they have more advanced control of water lines and on/off capability for leak mitigation. This is for a Ventana but others are similar.
First off, there is nothing to be afraid of with your wet bay panel. It looks daunting but if I can do it you can do it! First and foremost with anything you do on your motorhome you MUST get into a habit of taking pictures before you start and before you disassemble. There is nothing worse than trying to remember where things go and of course the ole having extra parts when you're done. So take pictures and document as you go. If needed also mark with tape or colored sharpees. I drew arrows on my lines with colored sharpees so I knew the direction and identification of lines. Do what works for you but this prep work prevents mancries.
The black rotary knobs simply pry off. These are your on/off knobs for drains and winterization flow controls.
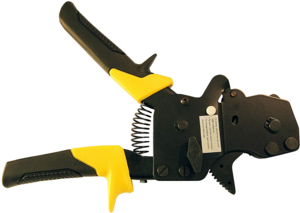
There are water lines with pex crimps. You need to use semi-large cutters to cut them off. You'll need to use a back and forth scissor/rocking motion to make them break at the crimp. When it comes time to replace you can learn how to use pex crimps (YouTube is your friend) or switch to hose clamps which work fine too. I like to learn (and suffer) and wanted to learn pex crimps so I bought this tool and it worked great. Make sure you buy the right sized crimp rings for your lines. You can get them from Newmar parts (comnet) or locally.
Remove the screws for your wet bay panel and note the metal framing behind it so you can put it back the same way. It's not rocket science. Unscrew the tank rinse connector and that's all there really is to it.
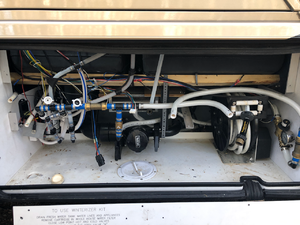
The lines on the left route from the tank and water pump, they can be a little confusing but this is a good opportunity to understand the flow from the tank bottom to your pump, etc. Just pay careful attention to the lines on the left side of your board, not a big deal!
Pay careful attention to placing all the removed screws and parts in a bin and if you want to even remember which screw went where you can organize as needed. This again is a great opportunity to properly mount tank sensor strips or add SeeLevel, modify as you need and in my case I installed Drainmaster gates.
For those that really want to take this to the next level you can even consider designing your own wet bay panel with access doors to more easily access your water pump, or whatever you need. As I had drilled a few holes for glove box holders, paper towel holders, etc. I took this opportunity to get a new wet bay board from Newmar parts, yep, it was expensive at near $250. But it revealed the manufacturer so you may be able to get it direct at half the cost as some Newmar parts seem to have a 200% markup. The board comes from Newmar parts spec'd for your coach with water pump switch installed, holes drilled for lines which I 3D printed caps for as I went to a dual filter system from Amazon that needed a wider spread and support for the heavy filters which can crack your wet bay board. Another thread on that for later.
@redbaron found a few resources but we never pursued, for here is what we looked at in designing our own boards:

 www.tapplastics.com
First off, there is nothing to be afraid of with your wet bay panel. It looks daunting but if I can do it you can do it! First and foremost with anything you do on your motorhome you MUST get into a habit of taking pictures before you start and before you disassemble. There is nothing worse than trying to remember where things go and of course the ole having extra parts when you're done. So take pictures and document as you go. If needed also mark with tape or colored sharpees. I drew arrows on my lines with colored sharpees so I knew the direction and identification of lines. Do what works for you but this prep work prevents mancries.
The black rotary knobs simply pry off. These are your on/off knobs for drains and winterization flow controls.
There are water lines with pex crimps. You need to use semi-large cutters to cut them off. You'll need to use a back and forth scissor/rocking motion to make them break at the crimp. When it comes time to replace you can learn how to use pex crimps (YouTube is your friend) or switch to hose clamps which work fine too. I like to learn (and suffer) and wanted to learn pex crimps so I bought this tool and it worked great. Make sure you buy the right sized crimp rings for your lines. You can get them from Newmar parts (comnet) or locally.
Remove the screws for your wet bay panel and note the metal framing behind it so you can put it back the same way. It's not rocket science. Unscrew the tank rinse connector and that's all there really is to it.
The lines on the left route from the tank and water pump, they can be a little confusing but this is a good opportunity to understand the flow from the tank bottom to your pump, etc. Just pay careful attention to the lines on the left side of your board, not a big deal!
Pay careful attention to placing all the removed screws and parts in a bin and if you want to even remember which screw went where you can organize as needed. This again is a great opportunity to properly mount tank sensor strips or add SeeLevel, modify as you need and in my case I installed Drainmaster gates.
For those that really want to take this to the next level you can even consider designing your own wet bay panel with access doors to more easily access your water pump, or whatever you need. As I had drilled a few holes for glove box holders, paper towel holders, etc. I took this opportunity to get a new wet bay board from Newmar parts, yep, it was expensive at near $250. But it revealed the manufacturer so you may be able to get it direct at half the cost as some Newmar parts seem to have a 200% markup. The board comes from Newmar parts spec'd for your coach with water pump switch installed, holes drilled for lines which I 3D printed caps for as I went to a dual filter system from Amazon that needed a wider spread and support for the heavy filters which can crack your wet bay board. Another thread on that for later.
@redbaron found a few resources but we never pursued, for here is what we looked at in designing our own boards:

Custom Manufacturing on Demand | Production Parts and Prototypes | Xometry
Xometry is a leader in high-precision production part and prototyping manufacturing on demand. Get instant quotes on CNC machining, 3D printing, sheet metal fabrication, laser cutting, and more.
www.bigbluesaw.com
Cut to Size, Polycarbonate & Acrylic Plastics : TAP Plastics
Have you been looking for a new plastic supplier? Click now to learn more about our services and wide selection of made-to-order materials, supplies, and tools today.


