Welcome to RVForums.com

  • Register now and join the discussion
  • Friendliest RV Community on the web
  • Modern site for PC's, Phones, Tablets - no 3rd party apps required
  • Ask questions, help others, review campgrounds
  • Get the most out of the RV Lifestyle
  • Invite everyone to RVForums.com and let's have fun
  • Commercial/Vendors welcome

MOD Installing a slow-close, bidet toilet seat on Dometic 8700 macerator toilet

Welcome to RVForums.com

  • Register now and join the discussion
  • Modern secure site, no 3rd party apps required
  • Invite your friends and let's have fun
  • Commercial/Vendors welcome
  • Friendliest RV community on the web
Where’s the proof?
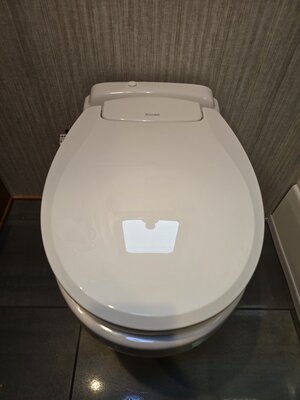
Here you go😁....Brondell 1400RW
20211214_080436.jpg
 
Is there a cross hair system in these things? Do you calibrate your alignment?
 
Maybe on @MrsSquid’a setup but mine is analog, so bombs are totally unguided.
 
Oh I could have fun with that remote.

I see it now...unsuspecting DW sits down for peace and quiet, away from kids, away from husband, just to take care of business and catch up on some screen time.

I wait for a few minutes, and then activate the bidet. .... then run away quickly.
 
Oh I could have fun with that remote.

I see it now...unsuspecting DW sits down for peace and quiet, away from kids, away from husband, just to take care of business and catch up on some screen time.

I wait for a few minutes, and then activate the bidet. .... then run away quickly.
Idk about your wife but with MapWife I could do it…once
 
I thought about a bidet as well. Concerning the "warm water", I think about getting that from the sink supply ? There must be a way to access that, below the floor, get a "T" in and route a flexible metal hose that comes up below/beside the toilet seat ? But I'm a newbie, so maybe that's just stupid ????
 
Do you hate the thinly painted, easy to chip, impossible to keep clean, slam down wooden toilet seat that comes on the Dometic 8700 series macerator toilet? ME TOO and I have been on a mission to find something to replace it with since the first day we got our RV. That Dometic would use such a low quality seat on such an expensive toilet is just ridiculous to me.

Part of the problem with replacing this seat is that residential toilet seat post holes - that is the hole on your toilet onto which the toilet seat is secured - is standardized across the industry at 5.5 inches on center. Dometic for whatever reason, decided to use a non standard spacing on their seat post holes 7.5 inches on center. This has made it practically impossible to replace their thinly painted, easy to chip, impossible to keep clean, slam down wooden toilet seat with an injection molded, slow close, easy clean toilet seat because the seat posts on the replacement seat will never align with the seat post holes on the toilet. ARGH!

Lucky for you - Dometic actually sells a very nice injection molded, slow close, easy clean, bidet toilet seat. The only problem is that it is attached to the Dometic 8541 master flush toilet which costs a whopping $2,604.54. Well maybe the 8541 seat is compatible with the 8700 and you can just buy the seat? I called Dometic to ask. The 8541 seat is not compatible with the 8700. I don't know that to be entirely true but I took them at their word. It might actually be.

Anyway, I thought I was stuck with this crappy toilet seat for eternity until I was in Lowes one day and just happened to walk right past their toilet seat section and took a second to glance and see if there was anything that seemed like I might be able to rig up to work on the Dometic 8700. That's when I saw the Brondell Ecoseat White Round Slow Close Bidet Toilet Seat for $97. Looking at the back of the seat where the seat posts would be, I wondered if the seat posts might be adjustable in spacing as some higher end toilet seats are, usually up to about 6.5 inches on center. It was. Then I went and borrowed a measuring tape from the front of the store and came back, and lifted the display model on the wall to reveal the seat post spacing, which uses an adjustable bracket that allows for installation on toilets with a post spacing ranging from 4.5" to 7.5". I immediately bought two and brought them home and showed them to MapWife who jumped with joy (yeah, we got excited over toilet seats. We're simple people. Don't judge us.)

So I immediately went to installing this in the master bath. Attaching the seat was really simple. I'd outline it but there's really no need deviate from what's specified in the installation guide. That gave us a plastic, injection molded, easy clean, slow close toilet seat. YAY!


Getting the bidet connected was a little more complicated and required some basic plumbing skills though. Now, some folks might not care for the bidet. That's cool. This is still the only slow-close, easy clean plastic seat I know of that fits the Dometic 8700 and if you don't want the bidet functionality, just don't connect it. It will work as a normal slow close toilet seat (an expensive one, I admit).

We wanted the bidet to work but for reasons I can't comprehend, the tee connection that comes with the seat is 7/8" x 3/8" x 7/8". Guess what? 7/8" fittings are quite non-standard and difficult to find. So off to Lowes I went to figure this out and here's what I came up with.

The plumbing assembly of a Dometic 8700 looks like this:
Mine looked a little different, with the plastic supply valve being strapped to the top of the black evacuation line by Newmar and the reinforced vinyl hose not being contorted into an upside down u-shape as pictured, but everything else was the same. To make this work, we need to install a tee with a 3/8" compression outlet, inline on the fresh water supply so that we can feed the bidet.

The easiest way would be if there were such a thing as a 1/2" MIP x 3/8" Compression x 1/2" FIP Swivel tee that we could put between the PEX supply coming out of the floor, and the reinforced vinyl hose supply line. No such thing exists as far as I can find and I didn't want to get into adapter hell, creating multiple points of possible failure in each adapter connection. So I did what any sane person would do, I replaced the plumbing.

Here's what I used for each installation:
  1. SharkBite Brass 1/2-inch PEX barb x 3/8-inch OD compression quarter turn dual shutoff valve (https://www.lowes.com/pd/SharkBite-1-2-in-PEX-x-3-8-in-OD-Compression-Dual-Stop/5001422649)​
  2. 3/8-inch compression 12-inch stainless steel flexible faucet supply line (https://www.lowes.com/pd/Homewerks-...Stainless-Steel-Faucet-Supply-Line/1000011602)​
Here's the steps:
  1. TURN OFF YOUR WATER PUMP & DISCONNECT YOUR CITY WATER LINE. FAILURE TO DO SO MAY RESULT IN YOU GETTING VERY WET.
  2. Locate the 1/2" PEX supply line coming out of the floor behind your toilet. On this supply line, you should see a 1/2-inch metal PEX clamp securing a 1/2-inch Female Swivel Elbow to the PEX supply line.
  3. Using a PEX clamp removal tool or heavy duty snips, cut the PEX ring securing the 1/2-inch Female Swivel Elbow to the supply line.
  4. Remove the 1/2-inch Female Swivel Elbow from the PEX supply line coming out of the floor. You may need to use all of your girl power to do this, or you might find it easier if you have enough excess PEX line to just cut the PEX line below the 1/2-inch Female Swivel Elbow. Dealer's choice.
  5. Slide a new, unused 1/2" PEX clamp over the 1/2" PEX line coming out of the floor
  6. Insert the SharkBite Brass 1/2-inch PEX barb x 3/8-inch OD compression quarter turn dual shutoff valve (https://www.lowes.com/pd/SharkBite-1-2-in-PEX-x-3-8-in-OD-Compression-Dual-Stop/5001422649) into the PEX supply line coming out of the floor
  7. Move the PEX Clamp ring up on the PEX line, ensuring it is wrapped around the portion of the Sharkbite shutoff valve that is inserted into the PEX line, then using your PEX clamp tool, clamp the PEX clamp ring around the PEX line and onto the fitting. Keep clamping until the tool releases. The tool will not release from the clamp ring until the connection is secure and water tight.
  8. Take the 3/8-inch compression 12-inch stainless steel flexible faucet supply line (https://www.lowes.com/pd/Homewerks-...Stainless-Steel-Faucet-Supply-Line/1000011602) and connect it to one of the 3/8" outlets of the Sharkbite shutoff valve now installed on the PEX supply line. Toss the nut and ferrule that is already attached. You don't need them. Connect the other end to the Dometic valve. These are compression fittings. They work like a garden hose fitting. There is a rubber ring in the base of each female screw fitting that makes the connection water tight. Ensure you have screwed them on tightly, but be careful not to over tighten.
  9. Take the 3/8-inch supply line that came with the Brondell Bidet seat. Connect the elbow end to the seat, and the other end to the second outlet of the 3/8" Sharkbite shutoff valve. Ensure your connection is tight. Again, you don't need the nut or ferrule that is already attached, so toss them.
  10. Ensure both of your Sharkbite dual shutoff valves are turned off.
  11. Turn on the water pump. The water pump will fill the PEX supply line coming out of the floor, but no water should progress to either the toilet or bidet.
  12. Verify there are no leaks between the PEX supply line and the shark bite dual shutoff valve
  13. If no leaks, open the valve that feeds the Dometic toilet and verify there are no leaks in the braided cable, or at the plastic supply valve where it feeds the Dometic toilet. Fill and flush the toilet to test.
  14. If no leaks, verify the Brondell bidet valve on the side of the seat is in the closed position and close the toilet seat.
  15. Open the shutoff valve that feeds the Brondell bidet seat. Water will fill the supply line to the bidet seat
  16. Keeping the toilet seat closed, operate the bidet seat valve. You should hear water spraying. If you need a shower, feel free to raise the toilet seat and hose off.

We've been using this for about 2 weeks now and love it. Despite what you might think, the bidet water is not ice cold. It's cool and dare I say refreshing, but not cold. The bidet really cuts down on toilet paper use, so whenever people go pandemic buying again, a 12 pack of TP should last us quite a while. Another benefit is that now we have a shutoff valve to the toilet, as well as the bidet. That's just nice to have in case anything ever goes haywire.


So there you go, a relatively easy mod for a nicer, easy clean, slow close toilet seat and if you like, a bidet as well!

If you're special ordering a coach, you might even be able to get Newmar to run a hot water line to the toilet and then go with Brondell's S102 model which has a mixing valve so you can spray your butt with warm water.
Thank you so much!!
 
Great writeup. Hate the thinly painted, easy to chip, impossible to keep clean, slam down (et al) factory toilet seat. Really don't love bidets (due to an incident 15 years ago in a very fancy Tokyo hotel where I was not sure I would survive after pressing one of the many icon buttons on a Japanese SuperToilet. As the saying goes - "choose wisely". I think I failed).

Still looking for a non-Bidet version with the 7.5" spacing - any updates? I'll peek in next time I am in Europe and see if they hold the key since it is not standard in USA.
Thanks
 

Latest posts

Latest resources

Back
Top