Welcome to RVForums.com

  • Register now and join the discussion
  • Friendliest RV Community on the web
  • Modern site for PC's, Phones, Tablets - no 3rd party apps required
  • Ask questions, help others, review campgrounds
  • Get the most out of the RV Lifestyle
  • Invite everyone to RVForums.com and let's have fun
  • Commercial/Vendors welcome

Beyond AGM replacement

Welcome to our community

  • Register now and join the discussion
  • Modern secure site, no 3rd party apps required
  • Invite your friends and let's have fun
  • Commercial/Vendors welcome
  • Friendliest RV community on the web

Travelman

RVF Regular
Joined
Aug 30, 2026
Messages
5
Location
NC Washington
RV Year
2026
RV Make
Coachman
RV Model
Beyond 22D
RV Length
22
Chassis
Ford Transit
Engine
3.5 Eco-Boost
Fulltimer
No
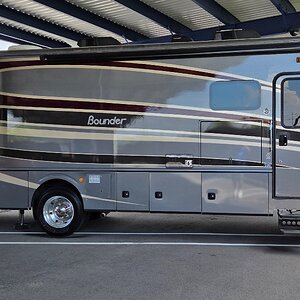
New to the forum as we just pulled the trigger on a Beyond 22D-good price on a 2026 because the new 2027 van are coming out. I wanted the 2026 because the new 27 don’t have a spare tire and the other changes seem minor for the price difference. We of course found the coach we liked (color and options)half way across the country but we are excited for the trip to pick it up.

I didn’t want the lithium model because they have eliminated the Cummins quiet generator for an additional alternator which seems like it could be a drag on mpg especially with large amp hours to recharge and I suspect trouble after a few years of heavy use, verses a 2.8 Cummins. So ours will have a 470 amp hour lithium battery replacing the stock Group 8D AGM battery (same size but lighter and maybe 3X the amp hours) and the quiet Cummins.

I am in the planning stage right now (ordering the battery, remote terminals etc). The dealer where I am purchasing the Beyond doesn’t seem too familiar with making the swap. I have watched a You Tube video on how easy it is to do (except for physically handling the 8D battery) but I can’t find anything on how to setup the Van’s system on recognizing lithium vs AGM. Has anyone made this lithium conversion on a 2025 or 2026 (with the Garmin) and could share the process to setup the new battery type?

Thanks, look forward to sharing our experiences and learning from The Coachman Owners Club.
IMG_2049.jpeg


Chuck
Travelman
Have Hun-Will Travel
 
My opinion, for a number of reasons you made a good choice to avoid the under hood generator. The 8D AGM is about a 300 A/H capacity battery. The combination of going Lithium and increasing capacity you will need to determine if the alternator charging system can handle that new combination.
 
That nice new recent production coach will have a 120vac to DC power converter that is designed to also support lithium CC/CV charging. It may automatically handle the lithium battery properly when connected and powered up. Older models of some converters had a slide switch (accessible with the converter face trim removed) to set them for lithium service.

The converter manufacturer's online product listing for your converter model will describe whether it handles lithium automatically on its own or not. If your coach has the power converter present in the breaker panel as a combination unit, open the door panel on it and read the make and model so you can look that up.

Unless you need a fast recharge while driving, you might want to consider placing a DC to DC converter of a modest amperage delivery capability between your existing chassis battery/alternator electrical connection point and the lithium coach house battery's positive terminal.

Also adding a normally open relay contactor in series to power the DC to DC converter from the chassis battery/alternator will allow automatic turn on if you power the relay field coil from a "hot when chassis engine is operating" connection. Be sure to place a fuse or DC modular circuit breaker in front of the DC to DC power inlet connection, size your conductors properly, and place a separate fuse in front of the relay field coil. (I like to also add a spike protection diode between a DC relay field coil"s positive terminal and chassis negative ground to dump the coil energy when the field coil loses it's power feed at shutdown.)

Years ago, some coaches (our 1989 HR Alumalite, for example) had an automatic coach battery relay connection system consisting of a small controller out front that powered a "Bird Relay" contactor field to connect the 12 volt coach house battery for charging once the controller detected chassis battery voltage rising due to engine alternator being active. You could buy that (or a similar controller and contactor sold for that purpose) to automate powering the DC to DC converter during drive times.

The 120vac to DC power converter in your new coach may only have a charge current capability of 20 or 30 amps DC. If you don't require fast recharge while driving along (higher charge current might be highly desirable for significantly deep discharge of the lithium battery in camp, such as when boondocking), you don't have to buy a high amperage DC to DC converter to implement what I described above. Modest current load by using a DC to DC converter capable of charging your lithium battery at 30 amps or so won't overstress your alternator.

I pray for you to be blessed with safe travels and happy camping!
Thank you for your response. This is exactly what I was looking for-confirms my thinking with some experience.

I saved two items off my travel trailer (being sold). One is a 20/40 Renogy dc to dc charger with the wire and fuses. Your post gives me the confidence to install it in our new Van. Also I have a lithium 60 amp charger (I used with a separate generator on my old trailer to directly charge my lithium batteries by passing the converter). It makes sense to do the same thing on board in the Beyond.

I will install a switch for both additions. So while traveling I will have the option to charge at the Vans own 7 pin trickle charge or boost by 20 amps or boost by 40 amps.

And while stationary running the generator I can charge the batteries with the converters 30-40 amps or I should be able to boost by 60 amps charging by adding the extra charger with a switch. The lithium battery I am getting has a 300 amp BMS so should easily handle the 100 amp quicker charge.

Really appreciate your help. I will look into the diode application for both installations to handle the loads when disconnecting.

Cheers and God Bless You,
Chuck
 
Chuck - Glad that was helpful. My long time pal Larry of Colorado Springs shared his development of such arrangements with me when he adopted LiFePo4 to support four to five day boondocking stays in his camper way off the beaten path in the Rockies. His Mrs enjoys tv by Starlink when they are not away from the camper in the rock crawler Jeep, so Larry's quest ended up solving the need to put back expended state of charge at modest genset run times and without overtaxing the alternator on the way home. I mainly learned and imitated his solutions.

The spike protection diode can be as simple as a placing a 1N4001 across a small pc board relay field in a microcontroller project, but a large auto service magnetic contactor field makes a big enough reverse voltage energy spike at field cutoff to require a more robust diode to absorb it. Might not be needed in a heavy battery cable connected circuit, but best to not let the spike go unabsorbed.

May god bless you, uplift your every moment, and give you safe travels in the new camper! 🙏🙂👍
 
An update on my new Coachmen Beyond 22D regarding the Lithium for AGM replacement. I thought I would report the progress and process for setting up a lithium battery for anyone thinking of doing it in a Beyond 22D with the conventional AGM battery, 2000 watt MultiPlus, Victron Cerbo GX, Garmin, and Go Power solar charger.

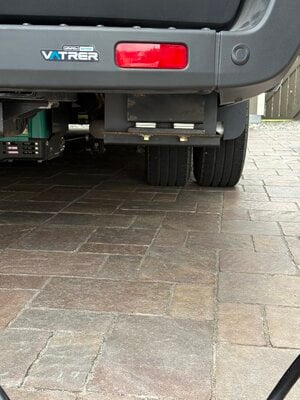
I decided to replace my AGM 200 lb inefficient “pig” of a battery (330 Ah but practically maybe 150 Ah useable) with a Vatrer marine battery packaged in a beautiful metal case offering similar dimensions but 460 Ah useable power. The Vatrer 460 Ah comes with a Bluetooth BMS (with temperature cutoffs and heat) all at 100 lbs. In cold temperatures this lithium battery will deliver 4x the power over my AGM.

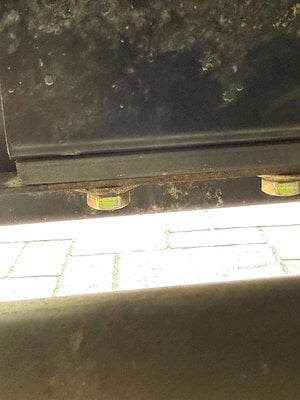
First thing was to be sure the Vatrer 460 would fit on the existing AGM battery tray. The horizontal dimensions are the same but the Vatrer is 3/4” taller. So I incorporated two spacer metal bars-the one on the forward side is a half inch metal spacer bar. The spacer bar on the back side included additional half inch spacer so that the battery sits level.

The terminals were the same size so securing the cables was a simple task.

Setting up the Go Power solar charger can be done on the Bluetooth app or by using the buttons on the screen. Just one easy change to LFP from AGM in setting. The charger will automatically make the necessary adjustment.

For the Victron MultiPlus settings I used Spacex free ai tool “Grok” to ask for parameters. I simply gave Grok the kind of battery, the model number of MultiPlus, the Cerbo GX and the Go Power charger model number and it spit out all the changes I needed to change in my MultiPlus inverter. All you need is a laptop (download the Victronconnect app), an Internet cable and buy a Victron Energy MK3-USB-C Interface – VE.Bus to USB-C Cable. I bought the USB-C version because I used an Apple laptop with C fittings. If you have a laptop with USB fittings than order the USB fitting.

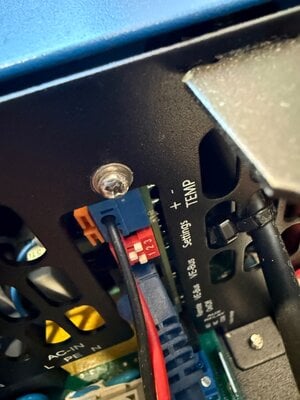
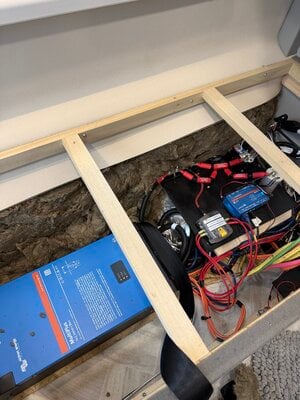
Initially you need to remove the driver side bench top to reveal the Inverter, remove the forward cover (two small screws), and be sure the inverter is powered on. The first thing that needs to be done is change the white toggle. This is something that Grok missed but I saw in a video from Victron-there are three toggles and you need to change the second toggle to “on” and then move the third toggle to “on” and then to “off” to save the setting. So when you are through the 2nd toggle is on and the 1st and 3rd toggle are off. This is the lithium setting(find photo of white toggles).

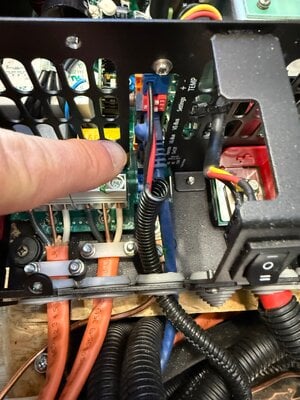
Next connect the Internet cable from the MK3 interface to the open terminal (photo of me pointing to the location) and open the Victronconnect app. It will find your MultiPlus inverter and Cerbo GX. You need to select the MultiPlus and then go up to settings. It will ask for a password (the password is zzz). You will instantly see a list of parameter categories-like Inverter and charger.

Start with charger and make sure the charger type lithium is “on”Grok’s other settings in Charger were that the charge curve is “fixed”, the adsorption voltage is 14.4 volts, the Float voltage is 13.5 volts (do not leave AGM 13.8v), absorption time 1 hour, change charge current to 80A (for my Vatrer), make sure equalization is “disabled”, temperature compensation is “off” and storage mode is “off” (or leave at a low value).

Now go back to the category menu and choose “Inverter”. Change the inverter DC input low shutdown to 11.85 volts (raise from AGM default of 10.8V so MuliPlus does not fight the BMS). Change the Input low restart a few volts higher than shutdown to 12.2V.

When you are done be sure to save and reset MultiPlus which will restart with your new setting. I went back in and double check that my setting were in and then button everything back up. You’re done!

One thing I noticed when I had the bench top off is Coachmen did a poor job or insulating the coach outside walls. I ran to Home Depot and put is another bin of rock wool insulation against the wall and floor on the driver side and the passenger side protection the freshwater tank and bed (just the outside walls-keep the inverter bay open for cooling.

My original thought was adding a DC to DC chassis charger and add to the Cummins generator with an add on charger but now I realize that the MultiPlus will be all the charging I will need for the Vatrer 460 Ah battery with the new 80A setting. I am a happy camper. 😎
 

Attachments

  • IMG_2164.jpeg
    IMG_2164.jpeg
    1.8 MB · Views: 0
  • IMG_2163.jpeg
    IMG_2163.jpeg
    1.9 MB · Views: 0
  • IMG_2158.jpeg
    IMG_2158.jpeg
    1.5 MB · Views: 0
  • IMG_2154.jpeg
    IMG_2154.jpeg
    2 MB · Views: 0
  • IMG_2169.jpeg
    IMG_2169.jpeg
    3.3 MB · Views: 0
I forgot to mention in my post that the Vatrer battery is $1000 on Amazon and the MK3 Interface for Victron settings is $53.55 on Amazon. I hope to sell my slightly used 8D AGM for $300 to a heavy equipment operator. The AGM goes for $1000 new but guessing most dealers buy them OEM for $790.
 

Latest posts

Latest resources

Back
Top Bottom