Welcome to RVForums.com

  • Register now and join the discussion
  • Friendliest RV Community on the web
  • Modern site for PC's, Phones, Tablets - no 3rd party apps required
  • Ask questions, help others, review campgrounds
  • Get the most out of the RV Lifestyle
  • Invite everyone to RVForums.com and let's have fun
  • Commercial/Vendors welcome

Oasis down again....

Welcome to RVForums.com

  • Register now and join the discussion
  • Modern secure site, no 3rd party apps required
  • Invite your friends and let's have fun
  • Commercial/Vendors welcome
  • Friendliest RV community on the web
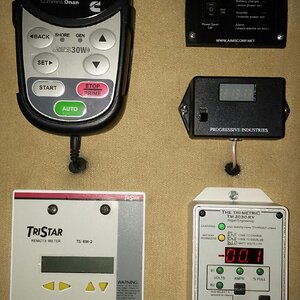
Here is a picture of my panel. Hope it helps.
2413C90D-1DFF-4B9B-8AB0-D6EB32B8338C.jpeg
 
And here’s the full panel
639D403F-2705-4199-B07C-53D044FF0B14.jpeg
 
Thank you Jerry. That helps. Hope I don't find some other mess in the back?
BTW, were your screws tight when you checked them?
All were tight, thank God!
 
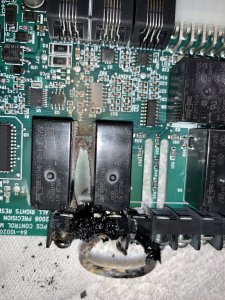
Pick the insulation and melted plastic off the terminals and take a pic for us.
 
New pick helps a lot. It is standard practice to only put one wire under a screw. Expansion of the wires varies depending on load and that is a recipe for loose wiring. When connecting more than one wire to a terminal best practice is run a pig tail for a wire nut connection for the three wires(just not as pretty). The wires did not loosen because of vibration but rather heating at different rates. As long as the board is not burned up you could likely solder a wire to the connecting point on the board and use wire nut to connect everything in the panel compartment.
 
Just an add on here. that type of block is designed for lugs not house wiring. It is being improperly installed.
 
Just an add on here. that type of block is designed for lugs not house wiring. It is being improperly installed.
Exactly what I thought too. Newmar did the same thing on my Oasis wiring below. Used common spade slip on connectors on high voltage #10 wires, instead of crimp connectors.
The result was the same: Melted wires insulation,
 

Attachments

  • 754B38FD-42DD-4C2B-8BA1-E4D1D286F2CA.jpeg
    754B38FD-42DD-4C2B-8BA1-E4D1D286F2CA.jpeg
    1.7 MB · Views: 28
Pick the insulation and melted plastic off the terminals and take a pic for us.
I will not disturb anything there until I have the replacement part in my hands. It can cause more problems that I don’t need right now.
 
I understand, I however have spaghetti when I troubleshoot. The plastic conduit is removed all zip ties have been cut and I am in the mess measuring and tracing. Then again I am certified and I won't tell you how.
 

Latest resources

Back
Top