Welcome to RVForums.com

  • Register now and join the discussion
  • Friendliest RV Community on the web
  • Modern site for PC's, Phones, Tablets - no 3rd party apps required
  • Ask questions, help others, review campgrounds
  • Get the most out of the RV Lifestyle
  • Invite everyone to RVForums.com and let's have fun
  • Commercial/Vendors welcome

Replacing Slide Toppers

Welcome to RVForums.com

  • Register now and join the discussion
  • Modern secure site, no 3rd party apps required
  • Invite your friends and let's have fun
  • Commercial/Vendors welcome
  • Friendliest RV community on the web

DavidL

RVF VIP
Joined
May 8, 2021
Messages
210
Location
Metamora, MI
RV Year
2002
RV Make
Newmar
RV Model
MountainAire
RV Length
4370
Chassis
Spartan K2
Engine
Cummins 500hp
TOW/TOAD
Grand Cherokee
Fulltimer
No
The slide toppers were getting really ratty. Torn, dirty, perforated. So, time for new ones. Amazon had a good price for bulk material. Bought two rolls. Pulled the old toppers off and powerwashed the RV, and the aluminum slide protectors to clean it all up.

Opened up the box and cut to length with a drywall right angle and a sharp utility blade.

Started to feed the cord into the slots...oh crap...the cord is slightly too large diameter. Upon research...mine are an older, smaller diameter cord. And I already cut the bulk fabric to length so can't return it.

So what to do?

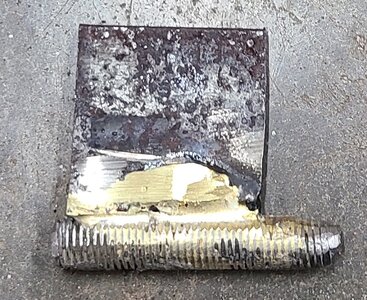
Hmmm, the parts are all extruded aluminum that the cord slides into...what if that was stretched out a bit. So, I fabricated a "Fid" out of a piece of threaded rod. Ground the tip down a bit to fit into the extrusion channel. Then, brazed a scrap piece of metal to hold onto the fid and to hammer. Worked pretty slick. I banged it all of the way down the length of the aluminum and widened up the channel just a bit.

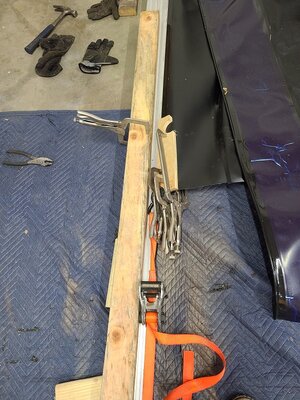
Then, I was able to get the cord into the new channel...but it was really tight. So, crafted a way to pull the cord / topper down the channel. Clamped some wood to act as long "pliers" to get lots of traction on the fabric without damaging it. Then, used a ratchet strap to pull the fabric. With so much length, there was a fair amount of friction. So much so, that the aluminum started to bow with the pulls. So, clamped a 2x4 down the length to make it more rigid.

Put some wiring water soluble lubricant on the cord to aid.

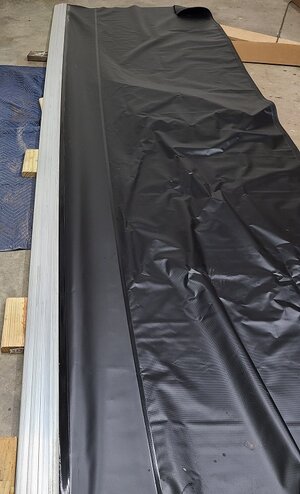
After about 10 minutes, the fabric was down the length are ready to put back on the RV. Thankfully the channel on the RV was the proper size so the fabric slid in nice and easy. I retorqued the topper windup spring to ensure good tension. Wound up nice and smooth and flat when the slide was pulled in.

So, it looks like new again and another project off the list.

So, the lesson is double check the cord diameter is right for your motorhome (both sides) before you cut the fabric :)
 

Attachments

  • SlideTopperFid_small.jpg
    SlideTopperFid_small.jpg
    283.2 KB · Views: 5
  • SlideTopperPuller_small.jpg
    SlideTopperPuller_small.jpg
    255.9 KB · Views: 7
  • SlideTopperComplete_small.jpg
    SlideTopperComplete_small.jpg
    149.3 KB · Views: 4
I need to have three of mine re-sewn. The fabric is good (Sunbrella) according to my upholstery guy, but the stitching is rotting out. So I guess I’ll be digging in to mine as well. Its one of the things I was going to have done at the service center since I was going to be there for a week anyway, but since I never made it there and lost my place in the queue, I guess I’ll have to tackle it myself.

I had one done locally and the stitching came out right (good auto upholstery shop in Auburn Ca), but the knuckleheads at the local RV repair shop left a lot of slack in the fabric so I didn’t want them to touch the others, and they are now out of business anyway. They made the R&R look like a two person job but from your description, I guess it can be handled by one, correct?
Putting the topper back on might need two people, or some good skills or some good stands to hold the free end while you feed the topper back into it's channel on the RV.
 
They made the R&R look like a two person job but from your description, I guess it can be handled by one, correct?
Depending on the length of the topper, maybe…

We had our FWS topper taken off while at the Mothership to accommodate some of the paint correction - five techs put it back on and they were working from scaffolding.

Older gentleman at our place in Florida last winter tried to do one of his by himself. Of course the slide was out (smaller bedroom slide) and when he loosened things the spring kicked in and about took him out.

I think a smaller one could be done by one person as long as the slide is in.

Personally I’d find at least one helper if I were doing one.
I’ll take all this under advisement. It would have been nice to have it all done in Nappanee - they do have a very nice scaffolding set up. But that trip was derailed by mechanical issues (my nightmare in Sidney NE) and the fact that the rally in Missouri was the week following my scheduled appointment so the service center was closed - the next available time slot was in November.

So plan B (or C or D….). I have a small portable scaffold I can work from so maybe I’ll try one of the small bedroom toppers first.
IMG_7522.jpeg
 
I did the short bedroom slide topper by myself. Step ladder mid span of the topper. A bit awkward. The kitchen larger slide, I had my son hold the free end. I had the slide Out and was able to walk on the roof of it to guide / pull the fabric forward down the channel. My son was on a step ladder.

5 techs? yowsa. I guess that's why they charge so much....that's way overkill. I can see three for a Full Wall Slide sized topper, the third to support mid span.

If I was by myself, I would have parked my man lift cage parallel to the RV side and put the topper on the railing of the cage to support the length. But faster to get my son to come to the aid.

If you didn't have a platform tall enough, I guess you could sling a rope across the width of the RV and loosely secure the end of the topper from falling with that rig. Would need a few trips up / down the ladder to reposition things as you progress getting the topper into it's groove.

The Spring: I had to unscrew the end cap to expose the slot to feed the fabric into it's channel. I put a long screwdriver into it's hole to keep it from unwinding. It has some torque so one has to be careful. Not quite as risky as a garage door spring, but same concept.

I had leftover topper material from the bedroom slide roll. Plan is to shorten the fabric length and use them for the window awnings so all match. But I have to find my sewing machine and get that setup. Another article for another day.
 
When I replaced the full wall topper, it was a 3 man job. 1 on the ground feeding it to 1 on a ladder threading it into the channel and I was on top of the extended slide pulling it.

I replaced my Carefree with Tough Top toppers. They have excellent videos on measuring and installing. Slide-Out Topper Vinyl Replacement Fabric
 
Great ingenuity ! Never though about cord dimensions. Guess I was just lucky when I recently ordered (and replaced) mine. The material came in 50 foot rolls and my FWS slide was around 22'. So I cut two sections of correct length and had another 12 feet left over 😊 Gave it to a friend for a smaller slide. It's certainly a two man job IMHO. I felt confident after watching numerous YouTube videos covering the topic thoroughly and the entire process took less than an hour (including cleaning etc.)
 
5 techs? yowsa. I guess that's why they charge so much....that's way overkill. I can see three for a Full Wall Slide sized topper, the third to support mid span.
Yeah, three were holding in position and the other two were doing the mounting screws. Looked like a real hassle keeping everything positioned properly while they fastened.
 

Latest resources

Back
Top