Welcome to RVForums.com

  • Register now and join the discussion
  • Friendliest RV Community on the web
  • Modern site for PC's, Phones, Tablets - no 3rd party apps required
  • Ask questions, help others, review campgrounds
  • Get the most out of the RV Lifestyle
  • Invite everyone to RVForums.com and let's have fun
  • Commercial/Vendors welcome

VIN 15 - Factory Build Log

Welcome to our community

  • Register now and join the discussion
  • Modern secure site, no 3rd party apps required
  • Invite your friends and let's have fun
  • Commercial/Vendors welcome
  • Friendliest RV community on the web
Ultimately I'm doing this for me, but for everyone interested, so once I know what you are all interested in, I can deep dive a little more in those areas.

As I said in a previous post, this is a new to the world machine. About the only thing in common with previous towable RV's are the owner skills associated with towing. And even towing is different because of aerodynamics and TrekDrive. So the early owners really have to learn the machine. These threads and posts go a long way to helping each other learn while at the same time leaving valuable information for other future owners.

It is not easy being an early adopter, but it is very interesting to learn and appreciate the new technology.
 
Found your video a couple of days ago and loved it. Thank you for taking the time to record this process. And thank you to Lightship RV for allowing a client to do this. As a potential client it's a great marketing tool to cement Lightship as my choice since this type of video series let's me see the process, people and gets me invested with the company. Looking forward to the series.
 
Found your video a couple of days ago and loved it. Thank you for taking the time to record this process. And thank you to Lightship RV for allowing a client to do this. As a potential client it's a great marketing tool to cement Lightship as my choice since this type of video series let's me see the process, people and gets me invested with the company. Looking forward to the series.

Agreed. +1 thanks to the Lightship team for allowing the access. As a startup their processes are far from mature but they’re evolving quickly, and it’s great seeing the evolution week to week.

This Wednesday I’ll be deep diving Station 2 where they install the actuators for the canopy cycling up and down. I’m intensely interested in this as a process and from a mechanical and functional standpoint.

Any questions you want me to ask the team just let me know!
 
Post # 4

VIN 15 Build Path Tracker | March 25, 2026

✓ Station 0 – Parts Staging
✓ Station 1 – Underbody
>> Station 2 – Tub Frame and Actuator Calibration (factory walkthrough this week)
□ Station 3 – Interior Assembly
□ Station 4 – Canopy
□ Station 5 – Marriage
□ Station 6 – Validation & Testing
□ Station 7 – Delivery

Legend:

✓ = VIN 15 current progress | >> = current post documentation | □ = Upcoming posts/videos

Quick summary

VIN 15 is still wrapping up in Station 1 with Station 2 – Tub Frame and Actuator Calibration up next.

Station 2 looks simple on paper. Install the bonded floor and four canopy actuators. In practice, it’s one of the more precision-dependent steps so far. Going into my purchase, my two biggest personal question marks were:

  1. TrekDrive efficacy for EV tow range, and
  2. Canopy actuator robustness (especially after miles of washboard dirt roads)
After a tow demonstration, I became comfortable with TrekDrive. Today’s visit increased my confidence in the Canopy actuators. Based on what I saw in person, the actuator assemblies appear significantly more robust than I expected from the spec sheets alone.

What happened this week

As always, thanks to Hayley, Ruby, Ben, Zach, and the production team for letting me wander the floor asking more questions than planned. Despite best endeavors the visits are never 30 minutes. I show up with a running list of “how does this actually hold up over time?” questions, and to their credit they keep taking the time to walk through them right on the floor with hardware, testing, and the people behind the decisions. Ben’s actuator deep dive this week was a perfect example of that level of access.

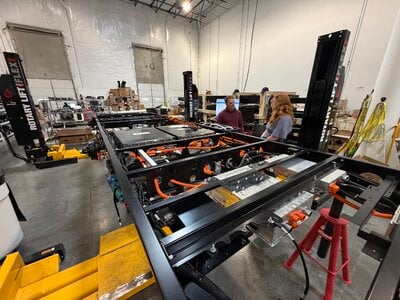
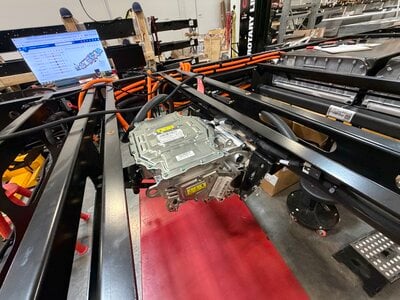
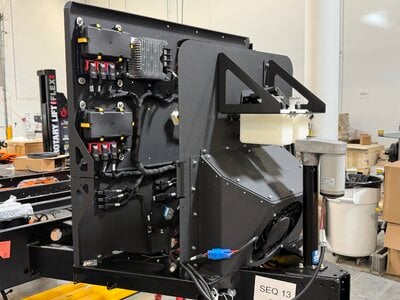
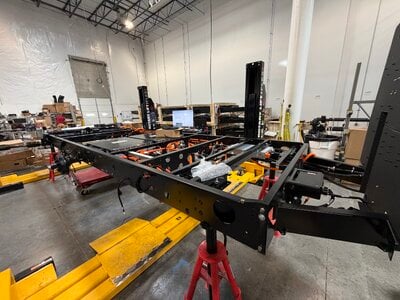
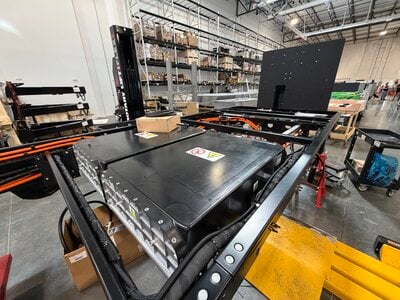
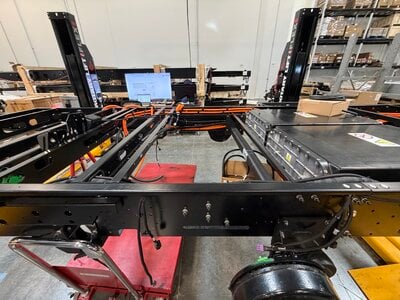
VIN 15 remains in Station 1, but the platform is starting to look substantially more complete than last week. Since my previous visit they’ve installed:

• Front axle
• Both HV batteries
• HV harnessing
• Coolant pumps
• BMU and onboard charger
• Tongue-box electrical center
• HVAC condenser and heat exchanger

There’s significantly more structural tubing than I expected. Zach mentioned this last week, but it really has to be seen in person to appreciate the scale. The photos and video give a better sense of it.

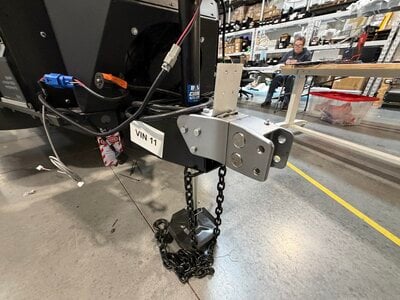
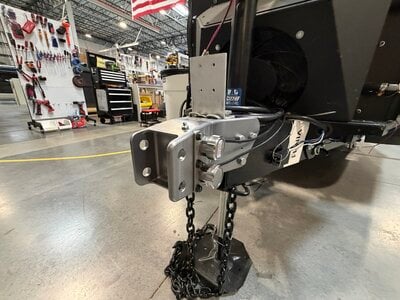
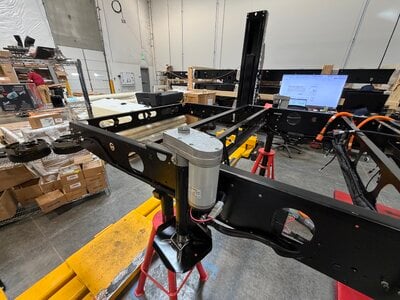
Station 2 – Tub Frame + Actuator alignment

Hayley mentioned last week that Station 2 looks simple but takes time. After seeing it, that tracks. Two major steps happen here:
  1. The bonded structural floor goes in
  2. The four canopy actuators are installed and aligned
The floor install itself is straightforward. The actuator alignment is not. Ben Robbins walked me through the validation work they do on the actuator assemblies. For anyone interested in a deeper cut on the actuators, the companion video has it all.

For those who can’t watch, here were my key takeaways:
  • The actuator and mounting structure are (of course) extremely rigid
  • The assemblies become even stiffer once the tub walls are added and bonded
  • In travel mode, the canopy load sits on bumper stops, not directly on the actuators
  • The customer experience with an actuator cycle is about 2 minutes up and 2 minutes down
  • There is a manual fallback if ever needed
I tried unsuccessfully – and with permission - to shake the actuator assembly while it was mounted. It didn’t move. That went a long way to answering my durability concerns, particularly after a dirt washboard-road type scenario pretty quickly.

What I learned from the team
I asked Hayley about customer support and how they’re thinking about long-term service scaling. Right now there are two support paths:
  1. Remote support - Phone diagnostics and software resolution where possible.
  2. Mobile technician support - Used when hands-on intervention is required.
Mobile service obviously doesn’t scale forever, so I asked when that changes. Her answer was simple: when the data indicates it should. She also walked through how quickly field learnings are already being pushed back into active production builds, with OTA functionality on the roadmap to support that longer term.

Fun observations from the factory
  • VIN 8 - Yellowbird was heading out for road testing while I was there. The rear light bars look even better in motion than in photos.
  • For those familiar with manufacturing environments, I noticed a clear step change in inventory organization and placement alongside builds.
  • Floor snapshot 03/25:
    • 1 unit road testing
    • 2 units in finishing (one staged for marriage)
    • 3 units active across Stations 1–3
    • 1 canopy staged and 1 looking close to ready

Photos and Video

Attached are updated Station 1 photos for VIN 15. This week’s video includes actuator alignment discussion with Ben as well as VIN 15 progress with Zach and Customer Support ethos with Hayley.


Questions for next week
  1. How are sub-floor wiring and plumbing installs validated before closure?
  2. What durability standards are required from utility vendors?
  3. How complex is the interior systems install once Station 3 begins?
If you have any questions you'd like me to ask, post below. Note, if they involve future stations, I'll hold them in reserve until that station.

Next Station in the VIN 15 Build Sequence

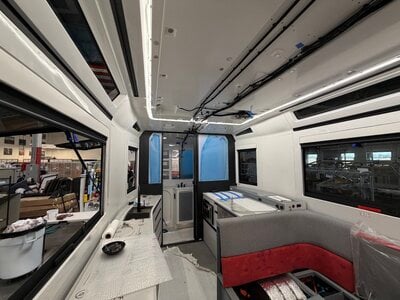
Station 3 – Interior Assembly which includes installation of interior systems including utilities, cabinetry, drawers, appliances, and internal electrical/plumbing systems.
 

Attachments

  • IMG_7776.JPG
    IMG_7776.JPG
    3.4 MB · Views: 0
  • IMG_7777.JPG
    IMG_7777.JPG
    5 MB · Views: 0
  • IMG_7778.JPG
    IMG_7778.JPG
    4.8 MB · Views: 0
  • IMG_7779.JPG
    IMG_7779.JPG
    5.5 MB · Views: 0
  • IMG_7780.JPG
    IMG_7780.JPG
    4.9 MB · Views: 0
What I learned from the team
I asked Hayley about customer support and how they’re thinking about long-term service scaling. Right now there are two support paths:
  1. Remote support - Phone diagnostics and software resolution where possible.
  2. Mobile technician support - Used when hands-on intervention is required.
Mobile service obviously doesn’t scale forever, so I asked when that changes. Her answer was simple: when the data indicates it should. She also walked through how quickly field learnings are already being pushed back into active production builds, with OTA functionality on the roadmap to support that longer term.

Excellent report as usual. I can confirm that tech support is working just as Hayley described. I have been pushing my LightShip in extreme temperatures down in the lower deserts of Arizona and California up to 110F. A real test for a new product. But since RV's are typically used in the Summer months this represents real world conditions that most people will experience.
 
Excellent report as usual. I can confirm that tech support is working just as Hayley described. I have been pushing my LightShip in extreme temperatures down in the lower deserts of Arizona and California up to 110F. A real test for a new product. But since RV's are typically used in the Summer months this represents real world conditions that most people will experience.

Yes ... talking to Hayley, I actually mentioned your quote, i.e., it's not if you're going to have an issue, it's how you're respond. That really resonated, in fact she quoted it back to me in the video.

I thought Ben's deep dive into the actuators was fantastic. All round, Lightship seem to have an authentic and committed team.
 
I have seen references to this. Where is it posted.

It was in the video link I included in my original Post #4.

Ben went into 10x more detail than I could write up, so I did the companion video along with post 4 ... if you can't see it, I can include it again. It's near the bottom of the post.

I may edit the post and move the link up higher - it's a long post - but Ben's explanation is really worth it.
 
Not seeing it. The only video I see is your Station 2 video.

Yep. That's right, his deep dive on the actuators is the central part of the Station 2 video (starts at 1 min, 50s).

He has another video from Lightship itself, maybe a short on YouTube showing the 1,000 cycles ... I didn't link that.
 
OK, I thought you were talking about a video by Ben Parker. Too many Ben's and Zacks at LightShip.:)
 
OK, I thought you were talking about a video by Ben Parker. Too many Ben's and Zacks at LightShip.:)

100% ... when I met him yesterday I had to keep double checking that his name was Ben. I felt like I was remembering the other Ben ... or Zach. Anyway, they're all great people. I felt like he gave me/us all really good insight into the actuators. There was a bunch of other stuff that I ended up cutting out of the explanations that's even more technical. If I get the urge after I take delivery, I'll do an out-take with some of the footage that didn't make the series ... I love the deep dives, but my mind can only understand so much.
 
Last edited:
Post # 5

VIN 15 Build Path Tracker | April 1, 2026

✓ Station 0 – Parts Staging
✓ Station 1 – Underbody
□ Station 2 – Tub Frame and Actuator Calibration (walkthrough completed 03/25)
>> Station 3 – Interior Assembly (walkthrough completed this week)
□ Station 4 – Canopy
□ Station 5 – Marriage
□ Station 6 – Validation & Testing
□ Station 7 – Delivery

Legend:

✓ = VIN 15 current progress | >> = current post documentation | □ = Upcoming stations/posts/videos

Preamble
This post is a bit longer than usual because we’re digging into the hitch sensor in some depth. Along with the actuator system, it’s one of the two defining Lightship technologies that really set this trailer apart from anything else on the market, so it naturally attracts more curiosity and skepticism and deserves a closer look.

Quick summary
VIN 15 is still wrapping up Station 1 – Underbody, with Station 2 – Tub Frame and Actuator Calibration up next.

This week we did a deep dive into:
  • Station 3 – Interior assembly walkthrough with Hayley
  • Hitch sensor and TrekDrive control logic walkthrough with Greg (software engineer)
Throughout Station 3 Hayley emphasized automotive-grade standards, durability, and functionality as the guiding principles behind every fixture and material decision. After seeing the components in person, that claim is hard to dispute.

Greg walked me through the hitch sensor system feeding real-time force inputs to TrekDrive so the trailer and tow vehicle act as a coordinated unit, along with several fail-safe behaviors that forum and video commentators have questioned.

The sensor reflects a familiar engineering pattern at Lightship. Apparent simplicity backed by substantial hidden complexity. The implementation is clean and elegant but clearly the result of significant development effort. Sessions like this continue to reinforce my confidence in the purchase decision.

What happened this week
VIN 15 remains in Station 1 as platform integration continues. Since last week, the team has:
  • Installed rear stabilizer jacks
  • Installed the HV PDU (Power Distribution Unit)
  • Continued routing HV, LV, coolant, and water lines throughout the vehicle
  • Installed the TrekDrive motor unit (motor, differential, and inverter integrated into a single assembly)
  • Installed the pump box, including water pump and accumulator, to pressurize and distribute water
Note, the HV PDU is a work of art. These are custom designed in-house and individually assembled by Steve (picture attached). Their job is to safely interrupt hundreds of amps at lethal voltages without internal arcing or contact welding. They are intentionally overbuilt as you’ll see from the photos.

Station 3 – Interior
Hayley walked us through the interior build out this week.

Interior Design Philosophy:
Lightship uses automotive-grade materials and construction rather than scaled-down residential RV components. Many suppliers come from automotive or adjacent industrial sectors rather than traditional RV catalogs.

Because the canopy raises and lowers, fixtures anchor directly into the tub walls and floor for rigidity. The wheel wells are integrated into concealed structures supporting the aerodynamic architecture. My patented
informal shake test showed the structure moving as a unit rather than individual components flexing independently.

Section-by-Section Interior Observations
Interior Architecture
  • Automotive-grade components throughout (not residential RV fixtures)
  • Fixtures anchored directly to tub walls/floor due to lifting canopy
  • Wheel wells integrated into cabinetry and utility spaces
  • Bonded wall interfaces increase structural stiffness
  • Interior behaves as a single rigid structure under load
Storage Console
  • Four perforated aluminum cabinets sized for Lightship adventure bags
Galley
  • Sheet-metal cabinet interiors (no flex-prone panels)
  • Sink module: 1 cabinet + 3 drawers
  • Prep module: microwave/convection/air-fryer, dishwasher, storage
Bathroom
  • Wet-bath layout draining to shower zone
  • Toilet positioned directly over black tank
  • Partition designed for canopy lift loads
Dinette / Bench
  • Electrically adjustable dual-pedestal table converts to double bed
  • Bench conceals water heater and utility panels with service access
Primary Bed
  • Dual-use platform supporting both sleeping and daytime cabin utility
  • Enables continuous access to under-bed gearage storage without converting the space
  • Storage also integrated within adjacent seating zones
  • Molded perimeter tray functions as a stable nightstand surface
  • Integrated power access and electronics catch areas
  • Converts a traditionally single-purpose RV footprint into an active 16-hour living surface rather than an 8-hour sleeping zone — I originally read this as a constraint; I now think it’s one of the smarter innovations in the layout
Seating + HVAC
  • Seating doubles as concealed duct routing
  • Direct airflow across ~70% of cabin volume
  • Indirect coverage to kitchen and bath
Station 3 – Bonus Deep Dive – The Hitch Sensor
TrekDrive reacts to force measured at the hitch rather than assumptions about tow-vehicle behavior. Key observations:
  • Measures axial load and tongue weight directly at the hitch using dual force pins
  • Maintains near-zero perceived tow load during normal operation
  • Activates regen assist automatically when the trailer pushes into the vehicle during deceleration
  • Trailer brakes engage only when the tow vehicle brakes
  • Operates as a passive trailer below ~15 mph; above that speed it actively offsets drag
Failsafe - Lightship defaults to standard trailer behavior in any abnormal or fault detection scenario.

Fun observations from the factory
  • VIN 8 – Yellowbird must be getting close to delivery. It was covered in rain from a test drive.
  • VIN 9 – Blue Elephant was sitting behind Yellowbird.
Photos and Video
Attached are updated Station 1 photos for VIN 15, along with several photos of the hitch sensor unit. This week’s video (linked below) includes a deeper walkthrough of the hitch sensor and TrekDrive integration along with the Station 3 interior session with Hayley for anyone who wants to see the hardware up close.


Next Station in the VIN 15 Build Sequence
Station 4 – Canopy, where the aluminum structure, frame cladding, roof assembly, solar installation, and wiring are integrated before Station 5.
 

Attachments

  • IMG_7805.JPG
    IMG_7805.JPG
    5.4 MB · Views: 0
  • IMG_7807.JPG
    IMG_7807.JPG
    5.2 MB · Views: 0
  • IMG_7810.JPG
    IMG_7810.JPG
    4.7 MB · Views: 0
  • IMG_7811.JPG
    IMG_7811.JPG
    4.6 MB · Views: 0
  • IMG_7812.JPG
    IMG_7812.JPG
    4.9 MB · Views: 0
  • IMG_7816.JPG
    IMG_7816.JPG
    5.4 MB · Views: 0
  • IMG_7818.JPG
    IMG_7818.JPG
    5.1 MB · Views: 0
  • IMG_7822.JPG
    IMG_7822.JPG
    4.4 MB · Views: 0
  • IMG_7823.JPG
    IMG_7823.JPG
    4.8 MB · Views: 0

Latest resources

Back
Top Bottom