Neal
Administrator
- Joined
- Jul 27, 2019
- Messages
- 14,003
- Location
- Midlothian, VA
- RV Year
- 2017
- RV Make
- Newmar
- RV Model
- Ventana 4037
- RV Length
- 40' 10"
- Chassis
- Freightliner XCR
- Engine
- Cummins 400 HP
- TOW/TOAD
- 2017 Chevy Colorado
- Fulltimer
- No
I've always admired the LED lighting on other RV's especially the awning lights on Girard awnings. I've also admired the cool under glow lighting I've seen on coaches and when a fellow Essex owner did an under glow project I was hooked. I had to do this. I researched various LED products and decided to use the same thing the Essex used which was by Boogey Lights. Seems like a quality product and they offer RGB lighting so you can change the colors, and now they offer a RGBWW which offers a more pure white light where the RGB option I have is an off white but still good. They offer various remotes which I prefer the M7 remote vs. the other key fob option, which I have one of by mistake, but with the bluetooth controllers which I highly recommend you can drive it all and typically will from your smartphone or tablet. Boogey Lights offers various lengths of their LED strips and various controllers that go up in size (and price) depending on the amount of LED lighting you're driving. A single strip can use a standard controller whereas the under slide and under glow required the larger controllers. Make sure you follow the guidance so you have enough power to drive your lighting.
Types of LED lighting I installed:
So now you want to install LED lighting, how are you going to run the wires? This was a challenge but a great lesson learned to understand my coach and how to get wires anywhere I want. Now that I understand the paths I can pretty much run anything needed. The awning tube I went top down into the half bath electrical cabinet and put a standard controller in there. Easy as the 12V power source is right there. I essentially adhered the LED light strip then ran the wiring up then back along the path a little using sikaflex or silicone to adhere it in place or use cable tie type adhesion pads you'll get with the Boogey lights to keep the cable runs in place. I had to drill with a 3 inch hole saw up near the existing cable bundle as I couldn't fit a wire down that path with any ease. That area is saturated with wires so as with any drilling you must be in complete control of the drill to stop once you get through.
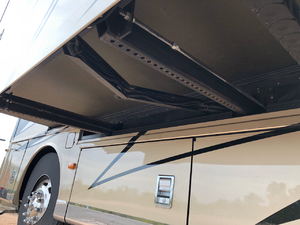
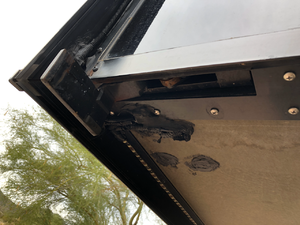
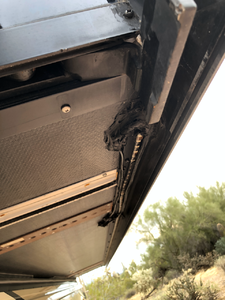
The full wall slide is actually not hard at all and with the under slide and slide topper I used the same path. You essentially route the wires through the existing angle path that extends/retracts as you'll see in the picture below. Newmar runs the wires from that contraption into the basement in the bay aft of the battery bay at least in my coach. From there you can run wires anywhere in the basement.
The patio/passenger side has other challenges. For my kitchen slideout the trick is the path under the sink. There is a plastic cover plate that has a daisy chain contraption that allows wires to run from the basement up into the slide. You'll essentially poke a hole in the basement ceiling material to run your wires up into that area. I ran the slide topper wire down the side of the slide then under the slide to an entry into the exterior TV bay then into the coach and following the exterior TV cables then down under the sink to get down into the basement and to the LED lighting controller area which I'll address next.
The under slide and slide topper for the bedroom slide was a puzzle to solve. It's even harder when doing this alone but I got lucky. I used the glow in the dark fishing rods you can get from Lowes and the path to about everything can be figured out by removing the black plastic top panel of your pegboard bay. From that area you run a fishing rod/stick aft along the exterior edge following the wires and water line which you will find at the back center of the bed. You'll have to remove the panels under the bed where you find your slide motor etc. That is where you'll be running the wire from the slide to your controller which will be in the bay forward of the pegboard bay where Newmar has all of their controllers for about everything. To get the LED wiring in from the slide topper and under slide in the bedroom slide I opted to drill a hole from bottom up into the side storage area on either side of the bed, I chose the forward side. You then drill into the side of the bed frame to get the wire from up in that storage area into the under bed area where you'll need to then run it into the back center area then over to the pegboard. Not easy!!! Also you'll see that you need to follow the path Newmar uses as this slide goes in and out and so does the wire in a path so you'll need to allow for that extend/retraction of that wire. The bedroom slide was a challenge but it is very nice to balance the entire side of the coach vs. just the kitchen slide.
Under glow was also a challenge to figure out but in the end makes perfect sense. The mounting of the LED's was a little challenge in the fore and aft horizontal runs having to assemble angled aluminum and mounting the hangars formed. The wiring was interesting. The two long under glow runs went up from the aft into the wet bay and pegboard bays, i.e. the aft most location to get up into the basement. I went into the wet bay aft of the bottom tray so as not to compromise the tray, actually I think I came up in between the tray and the fresh tank, probably drilling down from there. Behind pegboard area was the same. So that gets the LED lighting wiring on the side strips in. The forward of the tire LED's was three strips for the two sides and one side to side strip spliced together into a longer run going to the basement. The path was down the driver's side of the coach via the left front tire well over the battery bay and into the bay aft of the batteries and from there a run to your controller location. For me all controllers are in the bay forward of the pegboard. The aft LED lighting again are 3 strips spliced and then into a longer wire run that came over the passenger side aft dual axles. What you may not know is that at the rear wheels the side panel actually hinges so if you remove the "self tapping" screws at the bottom of that location you can then lift that side panel up to access the wheel well. I was able to secure the wire coming through there and into the pegboard bay and across to the bay forward for the controller. Takes some thought but this wire run is not that difficult. But it's a bit of work.
All boogey light controllers are mounted in the bay forward of the pegboard. I then got the 12V source by running wiring to the electrical bay by running wires across the basement into the OASIS bay then up and over and into the cord reel bay to 12V power sources. I used the fused panel as it was easy to tap into an existing ground and then use a spade connector to get 12V power. If I did it again I would instead use the self resetting breakers. I actually share a 12V source for under slide and under glow and you can tell when both are on the power is strained. Each controller should have its own dedicated 12V power source. The controllers themselves have inline fuses.
It's a lot of work and quite frankly a lot of money. All of my lighting, controllers, supplies probably is in the $2500-3K area. Do what you want for lighting, a lot of this is experimenting and exploring RV systems and cool things you can do. Slide toppers are awesome. Under slide is next up for benefit. Under glow is cool for the effect but I also hate a blacked out camping spot, I prefer some lighting and it helps me find my coach
I think that about covers it but the gist is don't be afraid to do anything to your coach. We can all help solve the puzzle with you. The benefit is you really learn your coach and in the land of RV's as they say if you can't do it yourself you'll go broke getting it done. You can do it. I never changed oil in my cars prior to the RV, i.e. I never did anything on my own. Now I really enjoy it and as the other saying goes, there's nothing your credit card can't fix Newmar can fix anything
Happy mod'ing
Types of LED lighting I installed:
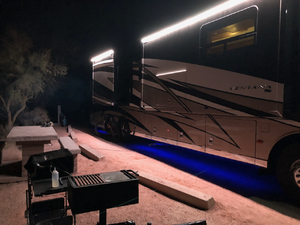
- Under Glow: This LED lighting runs the perimeter of the bottom of the coach. There are essentially four elements that are spliced together at the controller. The under glow also uses a track for mounting to the bottom of the coach so you mount the track and then add the LED lighting to the metal track. It also uses a diffuser to help with the lighting effect as you want it more spread out and less bright but you can also adjust the brightness within the app.
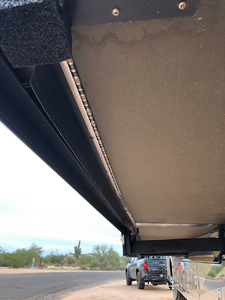
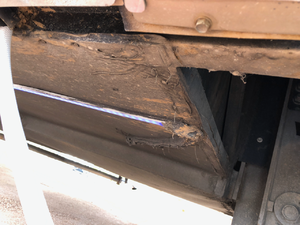
- Under Slide: I put LED lighting strips on the bottom/horizontal plane of each slide at the far outside. It does not interfere with the slide retraction i.e. no issues with it peeling off the LED lighting. The adhesive is very strong and you will prepare all areas by first cleaning with ISO Alcohol and applying a 3M primer to promote adhesion. The under slide provides a great effect too but it also provides outstanding lighting of all of your basements. It's also a great way at night to keep people from dividing their craniums on your slides!
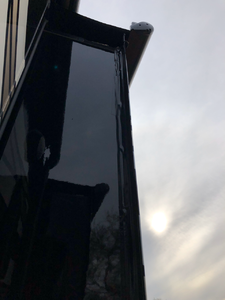
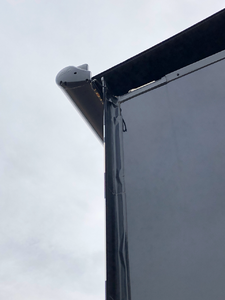
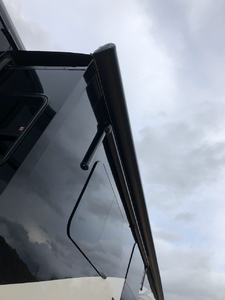
- Slide Toppers: As I don't and can't put LED lighting in the CareFree awning as it rotates and rolls itself up I opted to put LED lighting on the slide topper tubes. This is the area at the top of my slide that offers a great upper lighting location to light the side of the coach. This turned out to be an outstanding illumination that I first only did patio (passenger) side that I later did the entire Full Wall Slide. It has come in handy for walking the former dog, grilling, and also parking at night to illuminate the surrounding areas very well.
- Awning Tube: This was my first attempt at patio area lighting and it offers a nice effect with the awning out but it's not an ideal location. It was the first of all the lighting.
So now you want to install LED lighting, how are you going to run the wires? This was a challenge but a great lesson learned to understand my coach and how to get wires anywhere I want. Now that I understand the paths I can pretty much run anything needed. The awning tube I went top down into the half bath electrical cabinet and put a standard controller in there. Easy as the 12V power source is right there. I essentially adhered the LED light strip then ran the wiring up then back along the path a little using sikaflex or silicone to adhere it in place or use cable tie type adhesion pads you'll get with the Boogey lights to keep the cable runs in place. I had to drill with a 3 inch hole saw up near the existing cable bundle as I couldn't fit a wire down that path with any ease. That area is saturated with wires so as with any drilling you must be in complete control of the drill to stop once you get through.
The full wall slide is actually not hard at all and with the under slide and slide topper I used the same path. You essentially route the wires through the existing angle path that extends/retracts as you'll see in the picture below. Newmar runs the wires from that contraption into the basement in the bay aft of the battery bay at least in my coach. From there you can run wires anywhere in the basement.
The patio/passenger side has other challenges. For my kitchen slideout the trick is the path under the sink. There is a plastic cover plate that has a daisy chain contraption that allows wires to run from the basement up into the slide. You'll essentially poke a hole in the basement ceiling material to run your wires up into that area. I ran the slide topper wire down the side of the slide then under the slide to an entry into the exterior TV bay then into the coach and following the exterior TV cables then down under the sink to get down into the basement and to the LED lighting controller area which I'll address next.
The under slide and slide topper for the bedroom slide was a puzzle to solve. It's even harder when doing this alone but I got lucky. I used the glow in the dark fishing rods you can get from Lowes and the path to about everything can be figured out by removing the black plastic top panel of your pegboard bay. From that area you run a fishing rod/stick aft along the exterior edge following the wires and water line which you will find at the back center of the bed. You'll have to remove the panels under the bed where you find your slide motor etc. That is where you'll be running the wire from the slide to your controller which will be in the bay forward of the pegboard bay where Newmar has all of their controllers for about everything. To get the LED wiring in from the slide topper and under slide in the bedroom slide I opted to drill a hole from bottom up into the side storage area on either side of the bed, I chose the forward side. You then drill into the side of the bed frame to get the wire from up in that storage area into the under bed area where you'll need to then run it into the back center area then over to the pegboard. Not easy!!! Also you'll see that you need to follow the path Newmar uses as this slide goes in and out and so does the wire in a path so you'll need to allow for that extend/retraction of that wire. The bedroom slide was a challenge but it is very nice to balance the entire side of the coach vs. just the kitchen slide.
Under glow was also a challenge to figure out but in the end makes perfect sense. The mounting of the LED's was a little challenge in the fore and aft horizontal runs having to assemble angled aluminum and mounting the hangars formed. The wiring was interesting. The two long under glow runs went up from the aft into the wet bay and pegboard bays, i.e. the aft most location to get up into the basement. I went into the wet bay aft of the bottom tray so as not to compromise the tray, actually I think I came up in between the tray and the fresh tank, probably drilling down from there. Behind pegboard area was the same. So that gets the LED lighting wiring on the side strips in. The forward of the tire LED's was three strips for the two sides and one side to side strip spliced together into a longer run going to the basement. The path was down the driver's side of the coach via the left front tire well over the battery bay and into the bay aft of the batteries and from there a run to your controller location. For me all controllers are in the bay forward of the pegboard. The aft LED lighting again are 3 strips spliced and then into a longer wire run that came over the passenger side aft dual axles. What you may not know is that at the rear wheels the side panel actually hinges so if you remove the "self tapping" screws at the bottom of that location you can then lift that side panel up to access the wheel well. I was able to secure the wire coming through there and into the pegboard bay and across to the bay forward for the controller. Takes some thought but this wire run is not that difficult. But it's a bit of work.
All boogey light controllers are mounted in the bay forward of the pegboard. I then got the 12V source by running wiring to the electrical bay by running wires across the basement into the OASIS bay then up and over and into the cord reel bay to 12V power sources. I used the fused panel as it was easy to tap into an existing ground and then use a spade connector to get 12V power. If I did it again I would instead use the self resetting breakers. I actually share a 12V source for under slide and under glow and you can tell when both are on the power is strained. Each controller should have its own dedicated 12V power source. The controllers themselves have inline fuses.
It's a lot of work and quite frankly a lot of money. All of my lighting, controllers, supplies probably is in the $2500-3K area. Do what you want for lighting, a lot of this is experimenting and exploring RV systems and cool things you can do. Slide toppers are awesome. Under slide is next up for benefit. Under glow is cool for the effect but I also hate a blacked out camping spot, I prefer some lighting and it helps me find my coach
I think that about covers it but the gist is don't be afraid to do anything to your coach. We can all help solve the puzzle with you. The benefit is you really learn your coach and in the land of RV's as they say if you can't do it yourself you'll go broke getting it done. You can do it. I never changed oil in my cars prior to the RV, i.e. I never did anything on my own. Now I really enjoy it and as the other saying goes, there's nothing your credit card can't fix
Happy mod'ing


