DavidL
RVF VIP
- Joined
- May 8, 2021
- Messages
- 259
- Location
- Metamora, MI
- RV Year
- 2002
- RV Make
- Newmar
- RV Model
- MountainAire
- RV Length
- 4370
- Chassis
- Spartan K2
- Engine
- Cummins 500hp
- TOW/TOAD
- 2023 Corvette
- Fulltimer
- No
Ok, so here is about what got implemented. I had to get it functional for the HOOTS rally two weeks ago. In-between meeting HOOTs members, and Jeeping, etc, I started on the software to control the plumbing system.
First step was to get the Black / Grey tank dumping. Here is what works today:
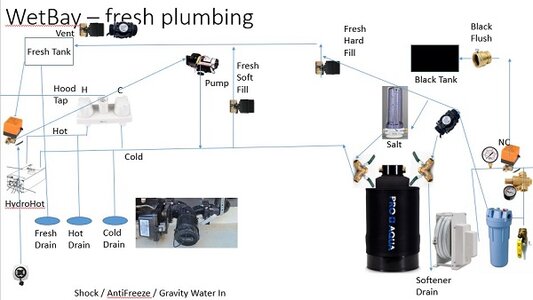
Black Valve (blade valve) opens for D seconds. Black Valve closes. Grey Valve (blade valve) Opens for E seconds. Grey Valve closes. Black Flush valve (3 way valve - top right) opens for F seconds. Flush valve closes. Black Valve opens for G seconds. Black Valve closes.
So, all tanks get emptied and black gets flushed with a single button push. I will now put a "Docked Mode" button safety in place to ensure that the system is connected to an open refuse system before the Empty Button can be activated.
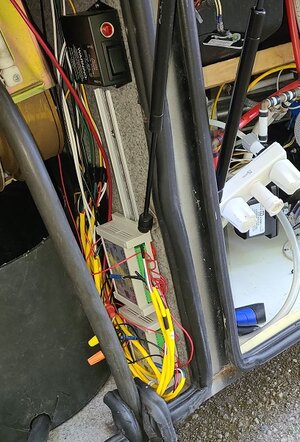
The timing for D,E,G can be long (multiple minutes) to ensure the tanks are fully empty before closing. The motor run for about 5 seconds to go full stroke. They are then turned off automatically. The blades don't care how long they are open or closed. The Flush timing F is just as long as you want the flush to be accomplished, but without filling the Black tank (that would be a problem). The valve motors automatically turn off their electric draw once they get full position so the motors don't care how long they are energized by the smart relays. There is a relay to Open, and a second relay to Close each valve. There are 8 relays to a relay hub and I am using two hubs (16 total relays). The relays are controlled by either Wifi or Ethernet. I choose Ethernet cable when possible to make the system more reliable.
The relays are controlled by our Allonis myServer 6 control system. All user interfaces, and timing / logic are controlled by myServer 6.
The Fresh water valve (far right top) controls campground water from entering the system. Plan is to use that so when the RV is not being monitored (at the store, Jeeping, at dinner, etc) that the Fresh valve closes to keep the possibility of flooding to a minimum if there was a leak somewhere.
There are manual valves to control softener regeneration. Just add salt to the filter chamber, and close the valve from softener RV plumbing, and turn on the fresh valve to the salt chamber and it will back flow the salt into the softener. Followed by a trickle of the water from the softener to the exterior drain hose. Today, this is all manual, but only takes a minute to change the modes. This could all be automated with more electric valves but I didn't think it was worth the investment.
There are motorized valves to select if the fresh tank is filled with softened water (valve above the grey flush) or city water (behind the softener).
I showed the working system to several at the HOOTs rally. Kinda neat watching / listening to the whirring motors, and seeing the drains function all by themselves")
Today I will be testing the 3 way valve (far left) that selects if the pump pulls water from the Fresh Tank or from the Antifreeze hose.
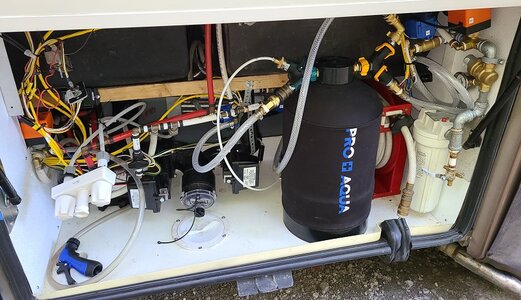
I have to complete putting the trim panels on to hide the inner workings and clean it all up. I think one more trip to verify all is working nicely and then I'll complete the project.
Works nicely!
Thanx Neal for the thoughts.
First step was to get the Black / Grey tank dumping. Here is what works today:
Black Valve (blade valve) opens for D seconds. Black Valve closes. Grey Valve (blade valve) Opens for E seconds. Grey Valve closes. Black Flush valve (3 way valve - top right) opens for F seconds. Flush valve closes. Black Valve opens for G seconds. Black Valve closes.
So, all tanks get emptied and black gets flushed with a single button push. I will now put a "Docked Mode" button safety in place to ensure that the system is connected to an open refuse system before the Empty Button can be activated.
The timing for D,E,G can be long (multiple minutes) to ensure the tanks are fully empty before closing. The motor run for about 5 seconds to go full stroke. They are then turned off automatically. The blades don't care how long they are open or closed. The Flush timing F is just as long as you want the flush to be accomplished, but without filling the Black tank (that would be a problem). The valve motors automatically turn off their electric draw once they get full position so the motors don't care how long they are energized by the smart relays. There is a relay to Open, and a second relay to Close each valve. There are 8 relays to a relay hub and I am using two hubs (16 total relays). The relays are controlled by either Wifi or Ethernet. I choose Ethernet cable when possible to make the system more reliable.
The relays are controlled by our Allonis myServer 6 control system. All user interfaces, and timing / logic are controlled by myServer 6.
The Fresh water valve (far right top) controls campground water from entering the system. Plan is to use that so when the RV is not being monitored (at the store, Jeeping, at dinner, etc) that the Fresh valve closes to keep the possibility of flooding to a minimum if there was a leak somewhere.
There are manual valves to control softener regeneration. Just add salt to the filter chamber, and close the valve from softener RV plumbing, and turn on the fresh valve to the salt chamber and it will back flow the salt into the softener. Followed by a trickle of the water from the softener to the exterior drain hose. Today, this is all manual, but only takes a minute to change the modes. This could all be automated with more electric valves but I didn't think it was worth the investment.
There are motorized valves to select if the fresh tank is filled with softened water (valve above the grey flush) or city water (behind the softener).
I showed the working system to several at the HOOTs rally. Kinda neat watching / listening to the whirring motors, and seeing the drains function all by themselves
Today I will be testing the 3 way valve (far left) that selects if the pump pulls water from the Fresh Tank or from the Antifreeze hose.
I have to complete putting the trim panels on to hide the inner workings and clean it all up. I think one more trip to verify all is working nicely and then I'll complete the project.
Works nicely!
Thanx Neal for the thoughts.
Attachments
Last edited:
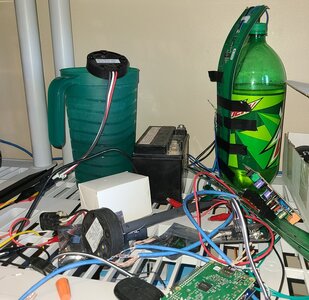
") ). The water pitcher has a capacitance sensor used in my Wakesurf boat ballast tanks. The capacitance sensor on the shelf is for gas level sensing for boats.
). The water pitcher has a capacitance sensor used in my Wakesurf boat ballast tanks. The capacitance sensor on the shelf is for gas level sensing for boats.