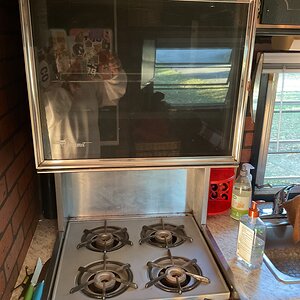
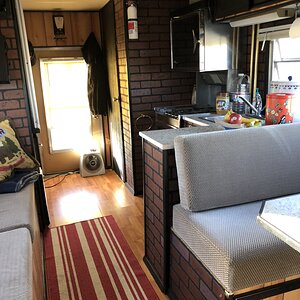
Back again! This is the converter cabinet, obviously. 97 Rexhall Vision. My question is, is everything I see in the lower cabinet the converter. Or, does any of that stuff stay? The fan isn’t working, and I’m pretty sure the converter is worn out. I’m just gonna replace the whole thing. Thank you
View attachment 19067Back again! This is the converter cabinet, obviously. 97 Rexhall Vision. My question is, is everything I see in the lower cabinet the converter. Or, does any of that stuff stay? The fan isn’t working, and I’m pretty sure the converter is worn out. I’m just gonna replace the whole thing. Thank you
My guess (more than a guess) is the colored screws hold the front on the panel.
You will be much happier with a 3stage charger converter, what you have is not!
Yes the whole bottom mess is the converter, but as you can see, when you take it out the cover has no where to anchor without some metal work.
The red wire should read 13??on the meter (voltage dc 24) on the meter. Ohm would be used to verify diodes don't leak, and a circuit is not broken or shorted. More uses but that is what you will use it for.
I would see if there is room behind where you can put the new converter, and extend the wires to reach it.
Oh one more thing! On the right side of the converter are the diodes. They are pressed into the aluminum plate,,and connect directly to the transformer.
Send your picture to Randy at BestConverter - Converters, Inverters, Electrical Supplies, Electronics and he‘ll be able to identify your existing converter and suggest a modern converter that will fit in that space, likely one of the “upgrade” converters. Then it will just be a matter of removing your existing converter, identifying the various leads, and installing the new unit. It is not a complicated or difficult job, but you need some direction to get it right.
I’m just confused on where all the wires go.
In the photo the red, black, and blue come down from the breaker panel. I’m the left, there’s the whit, and black wires.
The replacement converter doesn’t seem to have all of that.
I’m just confused on where all the wires go.
In the photo the red, black, and blue come down from the breaker panel. I’m the left, there’s the whit, and black wires.
The replacement converter doesn’t seem to have all of that.
Do all your wiring with the coach unplugged and generator off, and the house batteries disconnected.
The wires on the left come from the breaker panel and provide 120v ac to the converter. Black is hot (connected to one of the breakers and should be labeled “converter”), white is neutral (connected to the neutral bus bar with all the other neutrals), and hopefully there is a bare copper ground somewhere although I don’t see it.
The wires on the right provide 12v dc. Red is 12v + to charge the battery, white to the neg side of the fuse panel, and blue to the 12v + camper loads on the fuse panel. A proper replacement converter will have all these connections.
Consult to manual for the new converter to confirm connections. They should be clearly labeled. The picture in post #4 is just an example of a direct replacement chassis. Do you already have a new converter? If so what make and model?
So using ohms on the fuse panel check red terminal to top side of open fuse holder. Should have continuity. This will be positive terminal if it has continuity. White terminal should be negative. My guess is blue goes to battery positive, that is a guess! If that is true then blue and red can be tied together, and connected to converter positive terminal.
Other than that all you need to do is feed the power cord with 115vac.
This site uses cookies to help personalise content, tailor your experience and to keep you logged in if you register.
By continuing to use this site, you are consenting to our use of cookies.


 Blessings