Welcome to RVForums.com

  • Register now and join the discussion
  • Friendliest RV Community on the web
  • Modern site for PC's, Phones, Tablets - no 3rd party apps required
  • Ask questions, help others, review campgrounds
  • Get the most out of the RV Lifestyle
  • Invite everyone to RVForums.com and let's have fun
  • Commercial/Vendors welcome

Oasis down again....

Welcome to RVForums.com

  • Register now and join the discussion
  • Modern secure site, no 3rd party apps required
  • Invite your friends and let's have fun
  • Commercial/Vendors welcome
  • Friendliest RV community on the web
OMG @Buly, that's some scary stuff there!

I blew up the picture to look at it a little closer. There's more damage going on there than just at the top. That main negative wire looks to have take some abuse as well Almost looks like something scrapped the insulation off of it. And in one place the wire is actually exposed. What has happened in there?
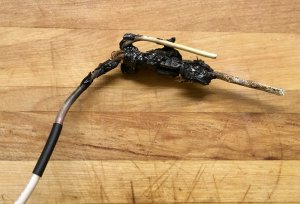
All the lugs on top are connected at the back, to a multi wire loom from the Power Control System. You can see the color wires at the back. That's why I want to get the proper part with wiring schematic. But today we were moving to another location, and I did not get an answer from the manufacturer on my inquiry.
My only guess is, one screw was loose, and started heating up?
I would not have used a single wire household conductors, but stranded wire with crimped eyelet terminals. But it is too much work and time for the production line.
 
It crossed my mind to send it to Newmar, but I know they have bigger fish to fry. Same thing with the defective ceiling lights burning up in large numbers.
I was there in person when I brought it up. They just shrugged their shoulders, and offered to sell me replacement ones. I have bought and replaced more than 10 fixtures. LED’s should last 30-50,000 hrs?
 
Today I gathered some desire to fix the Oasis electrical heater side. After checking everything around the unit, even replacing the AC relay, nothing changed.
Breaker panel was only thing left. Photo shows what I found. Another electrical “near fire” situation.
Now I need some drawing of how the wires are connected, since the labels are burned . If anyone knows, let me know.
Thanks
@Buly Am I looking at a jumper from 3rd post to 5th 4th post, right to left?
 
Today I called again Precision Circuits to order the burned out part. $300 o_O I thought maybe they are trying to sell me the whole CB panel? Nope!
That little section apparently has a circuit board behind with some electronics leading to the display panel. When I asked for some wiring schematic, Theytold me that the manufacturer has them?
Stay tuned......
 
@Buly Am I looking at a jumper from 3rd post to 5th 4th post, right to left?
I don't know what you mean Kevin? The photo is of the top right of the panel. Even I can not figure out what is what there. The wires are melted together.
 
Here is a picture of my panel. Hope it helps.
2413C90D-1DFF-4B9B-8AB0-D6EB32B8338C.jpeg
 
And here’s the full panel
639D403F-2705-4199-B07C-53D044FF0B14.jpeg
 
Thank you Jerry. That helps. Hope I don't find some other mess in the back?
BTW, were your screws tight when you checked them?
All were tight, thank God!
 
Pick the insulation and melted plastic off the terminals and take a pic for us.
 
New pick helps a lot. It is standard practice to only put one wire under a screw. Expansion of the wires varies depending on load and that is a recipe for loose wiring. When connecting more than one wire to a terminal best practice is run a pig tail for a wire nut connection for the three wires(just not as pretty). The wires did not loosen because of vibration but rather heating at different rates. As long as the board is not burned up you could likely solder a wire to the connecting point on the board and use wire nut to connect everything in the panel compartment.
 
Just an add on here. that type of block is designed for lugs not house wiring. It is being improperly installed.
 
Just an add on here. that type of block is designed for lugs not house wiring. It is being improperly installed.
Exactly what I thought too. Newmar did the same thing on my Oasis wiring below. Used common spade slip on connectors on high voltage #10 wires, instead of crimp connectors.
The result was the same: Melted wires insulation,
 

Attachments

  • 754B38FD-42DD-4C2B-8BA1-E4D1D286F2CA.jpeg
    754B38FD-42DD-4C2B-8BA1-E4D1D286F2CA.jpeg
    1.7 MB · Views: 30
Pick the insulation and melted plastic off the terminals and take a pic for us.
I will not disturb anything there until I have the replacement part in my hands. It can cause more problems that I don’t need right now.
 
I understand, I however have spaghetti when I troubleshoot. The plastic conduit is removed all zip ties have been cut and I am in the mess measuring and tracing. Then again I am certified and I won't tell you how.
 

Latest posts

Latest resources

Back
Top