Welcome to RVForums.com

  • Register now and join the discussion
  • Friendliest RV Community on the web
  • Modern site for PC's, Phones, Tablets - no 3rd party apps required
  • Ask questions, help others, review campgrounds
  • Get the most out of the RV Lifestyle
  • Invite everyone to RVForums.com and let's have fun
  • Commercial/Vendors welcome

Ridiculously cheap, ridiculously easy mods to consider

Welcome to RVForums.com

  • Register now and join the discussion
  • Modern secure site, no 3rd party apps required
  • Invite your friends and let's have fun
  • Commercial/Vendors welcome
  • Friendliest RV community on the web
Thank you very much. Did you buy a different molded plastic piece to mount the faucets to? Thanks again.
No, that's the original from the shower setup
 
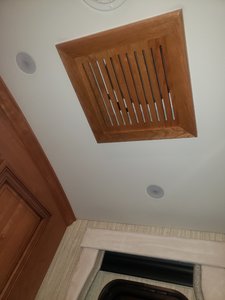
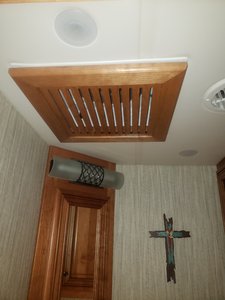
I wanted to add the cherry wood fantastic fan covers to the bathrooms rather than two big holes in the ceiling. Called Newmar and they wanted a ridiculous amount of moola that I just couldn't justify. So I went up to the wood shop here in Happy Trails and made my own. I think they turn out to be just as nice as the OEM one in the galley.
 

Attachments

  • 20200105_070322.jpg
    20200105_070322.jpg
    1.3 MB · Views: 124
  • 20200105_070400.jpg
    20200105_070400.jpg
    1.1 MB · Views: 110
I wanted to add the cherry wood fantastic fan covers to the bathrooms rather than two big holes in the ceiling. Called Newmar and they wanted a ridiculous amount of moola that I just couldn't justify. So I went up to the wood shop here in Happy Trails and made my own. I think they turn out to be just as nice as the OEM one in the galley.
Wow! Very nicely done.

TJ
 
DW wanted to add them but I hadn’t got around to calling Newmar to price, care to elaborate?

I think yours look just as good
 
As @lostinfla posted, I replaced the wet bay shower with the same faucets. For the black tank rinse I wanted to use the water source before it entered the house filters.
4CD6B32D-DE3C-4F2F-B2BB-8A8DE1F9B7FA.jpeg
FE4165C2-27A6-4502-A52C-85674B70493C.jpeg

The hookup has another back flo attachment, the the coach has its own back flo and air gap unit already in place and the rinse hose is never left attached to the clean out so I’m satisfied that this safer than if I were running a separate hose to the water source each time I back flushed with the park water source.
 
DW wanted to add them but I hadn’t got around to calling Newmar to price, care to elaborate?

I think yours look just as good

If i remember correctly they were north of $250 each. Not 100% sure of that.
 
As @lostinfla posted, I replaced the wet bay shower with the same faucets. For the black tank rinse I wanted to use the water source before it entered the house filters. View attachment 744View attachment 745
The hookup has another back flo attachment, the the coach has its own back flo and air gap unit already in place and the rinse hose is never left attached to the clean out so I’m satisfied that this safer than if I were running a separate hose to the water source each time I back flushed with the park water source.
Sure like how you have the filters installed. I want to do that to mine too. Also looks like you cut the back plastic panel in half. That is perfect so you can remove and inspect or get behind the panel without as much trouble as the one piece backing.
 
Sure like how you have the filters installed. I want to do that to mine too. Also looks like you cut the back plastic panel in half. That is perfect so you can remove and inspect or get behind the panel without as much trouble as the one piece backing.
Actually, the right half of the bay panel is a 1/4” plastic sheet that I cut to size and mounted over the original panel. The factory panel is so flimsy that I was afraid of mounting the double filter and towel holder on it. I did the same with the right sidewall where the pressure regulator is mounted. Much, much sturdier now.
 
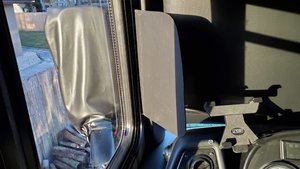
Got sick of looking in the drivers mirror and seeing nothing but reflection off the windshield, so I moved the mirror forward and made a shield from black poster board that tucks into the front A pillar trim/shade track. Eliminates the glare and makes the mirror much more useful

.20200109_075002.jpg
 
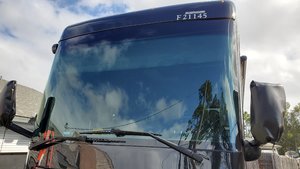
With the tip from J&JD, I ordered the drip rail. New windshield in, drip rail installed (above the windshield on the cap), ready for Tampa! As it turns out, I didn't have to move the numbers, but since I've got a new set on order, I'll replace them a little higher.

20200110_113615.jpg
 
That's where I'm thinking of installing mine too, it arrived yesterday, have to get it from the office. I didn't realize it was that flexible, hope it holds on those curves.
 
That's where I'm thinking of installing mine too, it arrived yesterday, have to get it from the office. I didn't realize it was that flexible, hope it holds on those curves.
It will hold on the curves pretty well. After about a year the end on the PS came loose about an inch. Put a couple of drops of silicone glue on it and it has been fine for many months and many thousands of miles. The DS is still well stuck in place.
 
Today I joined the "drip rail" club. :) Not the most optimum day to do this as it's not very warm. But I left the rubber in a heated room so it wasn't all that difficult to bend it around the window. I taped the curves down, so hopefully they'll stay there when I remove the tape.
 
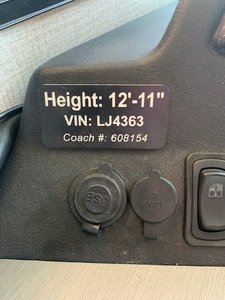
There are three (3) numbers I can never remember when I need them so I had this tag make and put it on my front dash. Ordered it off of Amazon. I did "field measure" the coach at several points sitting in my garage at ride height to come up with a height number I felt good about.

FLSteve

Label.jpg
 

Latest posts

Latest resources

Back
Top