Welcome to RVForums.com

  • Register now and join the discussion
  • Friendliest RV Community on the web
  • Modern site for PC's, Phones, Tablets - no 3rd party apps required
  • Ask questions, help others, review campgrounds
  • Get the most out of the RV Lifestyle
  • Invite everyone to RVForums.com and let's have fun
  • Commercial/Vendors welcome

Question 2024 DutchStar head light bulb replacement LED

Welcome to RVForums.com

  • Register now and join the discussion
  • Modern secure site, no 3rd party apps required
  • Invite your friends and let's have fun
  • Commercial/Vendors welcome
  • Friendliest RV community on the web
Next steps :

From Internet:

Verify Automotive Ground

To verify an automotive ground, you can use a multimeter to check the resistance between the ground wire and the vehicle's chassis. Set the multimeter to the ohm range and touch one probe to the metal chassis of the car and the other probe to the ground wire. The reading should be 0 ohms, indicating a good ground connection. If the multimeter shows any resistance, the ground wire may be faulty and needs to be replaced

It's important to ensure that the grounding point is free of paint, rust, or plating, as these can prevent a good ground connection Grounding an accessory to the engine should ideally involve running a ground wire directly to the alternator case and ensuring there is no paint between the starter and the engine block mounting surface

Additionally, a quality ground point should be bare unpainted metal, allowing for electromagnetic waves to travel and complete circuits without interruption Poor-quality ground points, such as those covered in rust or paint, can act as a resistant coating or insulator, reducing conductivity and potentially causing devices to function intermittently or not at all

For best results, locate existing factory ground points on your vehicle, which tend to look like bolts or metal studs, and ensure they are bare metal If necessary, you can sand off paint or rust to expose the metal
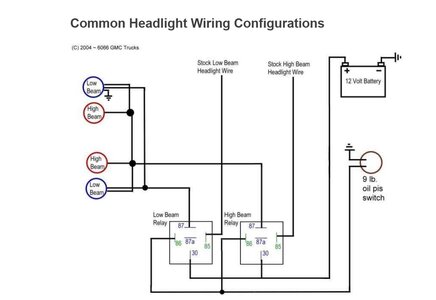
Glad I don't trust everything I read on the net!
 
Here is the GROK ground testing comments:

Verifying automotive grounding systems is critical to ensure proper electrical function, prevent component damage, and maintain safety. A faulty ground can cause issues like dim headlights, erratic sensor behavior, or even failure to start. Here’s a concise guide to verify automotive grounds using a multimeter, based on standard practices:
Tools Needed
  • Digital multimeter (set to ohms for resistance or DC volts for voltage drop)
  • Wrench or screwdriver (to access ground points)
  • Wire brush or sandpaper (to clean connections)
Steps to Verify Automotive Grounds
  1. Safety First
    • Park the car on a flat surface, engage the parking brake, and turn off the ignition.
    • Disconnect the battery’s positive terminal to avoid electrical shock or short circuits, unless testing under load.
  2. Locate Ground Points
    • Common ground points include the battery’s negative terminal, chassis, engine block, or alternator case.
    • Ensure ground points are free of paint, rust, or corrosion, as these act as insulators.
  3. Test Ground Resistance (Ohms)
    • Set the multimeter to the ohm (Ω) setting.
    • Connect one probe to the battery’s negative terminal and the other to the ground point (e.g., chassis bolt or engine block).
    • A reading close to 0 ohms (typically <5 ohms) indicates a good ground. Higher resistance suggests corrosion or a loose connection.
    • Repeat for other ground points, noting that resistance may vary slightly (e.g., engine block may read lower than a rear chassis point).
  4. Test Voltage Drop (Under Load)
    • Reconnect the battery and turn on the ignition or the component being tested (e.g., headlights).
    • Set the multimeter to DC volts.
    • Place one probe on the ground point and the other on the battery’s negative terminal.
    • A voltage drop <0.05 volts under load indicates a good ground. Higher values suggest a weak connection needing repair.
  5. Visual Inspection
    • Check ground wires and terminals for corrosion, fraying, or loose bolts.
    • Clean corroded surfaces with a wire brush or sandpaper and tighten connections securely.
  6. Fixing Bad Grounds
    • Replace damaged ground wires or straps with appropriately gauged wire (larger gauge for high-current components like audio amplifiers).
    • Ensure direct metal-to-metal contact at the ground point.
    • If issues persist, trace the wiring harness for breaks or consult a mechanic.
Common Signs of Bad Grounds
  • Flickering or dim lights
  • Engine stalling or rough idling
  • Malfunctioning electronics (e.g., ECU errors, low fuel pump pressure)
  • Audio system noise (e.g., whining in speakers)
Notes
  • Always use a multimeter for accurate testing; test lights can damage sensitive electronics like ECUs.
  • For complex issues (e.g., intermittent ECU communication failures), check wiring schematics or consult a professional, as high resistance (>0.3 ohms) between cab, frame, and engine can cause problems.
  • Regular maintenance, like cleaning battery terminals and inspecting grounds during service, prevents issues.
If you’re not confident or encounter persistent issues, take the vehicle to a qualified mechanic to avoid further electrical damage.
 
Reminds me of seeing a car from behind with the lights on, then hits the brakes and one side goes dark. = Bad ground.
 

Latest resources

Back
Top