Just to prove that us 3D printing geeks don't spend all day just fixing our printers, thought it's time to show the kind of thing we can create. This was designed/printed to improve the efficiency of our silverware drawer. Here are before and after pictures:
I created bins for my pantry sliders, not sure if I ever showed them here. Takes a long time to print but it gives you full height of storage within each bin to just underneath the pantry drawer above. Can really improve pantry storage by taking advantage of full height.
@Neal are you back up and printing? I'd like to see a pic of your pantry slider bins.
There is a new firmware release (major) available: 3.9.0. Also, my Prusa shipment arrived...let me know if you want a couple PTFE tubes.
Hope your rehab is going well.
@BuckyII my Prusa shipment was supposed to come today but it got delayed in customs, it arrived in Memphis today so it will probably deliver tomorrow. I ordered 4 PTFE tubes and a few more spools of various things as the shipping was the same with 4 PTFE tubes vs. tubes + filament. I know you offered and appreciate it but you should keep them. I got the hot end kit which I assembled and then got the assembled one that was supposed to come with a PTFE tube which it did, some junk that is not the one for the i3 MK3S so I thought it was misleading. I'll probably keep the hotend in my spares. I had to buy a few extra fans about a year ago as one of those thin wires broke out of the blue so next time around at Prusa you may want to add a spare fan, it's the one on the front of the extruder that failed for me.
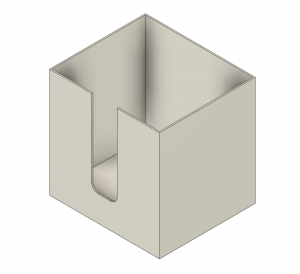
I'm going to update the firmware as soon as I get reassembled, it's downloaded and waiting. I'll see if I have any pics of the pantry sliders soon but here is the concept in Fusion.
I think when this hotend goes in I'm going to use the Olsson Ruby nozzle I bought and just stick with it. A YouTube video popped up on it today which has me convinced to try it again.
@Neal are you back up and printing? I'd like to see a pic of your pantry slider bins.
There is a new firmware release (major) available: 3.9.0. Also, my Prusa shipment arrived...let me know if you want a couple PTFE tubes.
Hope your rehab is going well.
Filament is flowing again but not after 4 hours of fiddling. MMU2 issues as usual but probably because the Olsson Ruby nozzle is/was clogged. Once I removed it and used the new brass one all works as expected. Done fiddling! Have plastic to burn!! 30 hour print has started.
I took mine out of the box to fined loose hardware. It looks like I am missing a spring for the base. . Had to send an email on the issue. Will see what happens.
I took mine out of the box to fined loose hardware. It looks like I am missing a spring for the base. . Had to send an email on the issue. Will see what happens.
This site uses cookies to help personalise content, tailor your experience and to keep you logged in if you register.
By continuing to use this site, you are consenting to our use of cookies.


")
 . Had to send an email on the issue. Will see what happens.


