Notsotalltexan
RVF Supporter
- Joined
- Mar 21, 2023
- Messages
- 116
- Location
- San Antonio, TX
- RV Year
- 2022
- RV Make
- Tiffin
- RV Model
- Allegro RED 340 38LL
- RV Length
- 39
- Chassis
- Freightliner Custom Chassis
- Engine
- Cummins 340
- TOW/TOAD
- 2021 Jeep Wrangler Unlimited
- Fulltimer
- No
Dear Neal--I am not a solar expert but I have learned a lot from others here mainly @Chuggs who guided me through my solar install which I mirrored his setup and then took it a few steps further. I wanted to share what I have learned to date as it may help others and I welcome others that also installed solar to add your opinions, correct me where necessary, and help to educate the RV community with where we are with solar as of this writing closing out 2019. These are only my opinions, it's okay if you don't agree, take from this what you want, discard what you don't want. I am writing this based on my knowledge of my coach brand - Newmar, others may vary.
Solar Prep
If you have the opportunity to order your coach you may be presented with an option to add solar prep. In my opinion everyone should add this option whether you intend to add solar or not. The next owner or owner after that may want to add solar and having these few wires run at build time will sure make adding solar an easier endeavor. At the time of ordering your coach you may have no plan to ever use solar and later change your mind. Not getting your coach solar prepped would be a huge mistake.
Solar prep is nothing more than running a positive and negative 6 AWG wire to your roof in addition to an ethernet cable run from your basement to your inverter control head inside the coach. These wires will be coiled and attached to a basement wall.
Why Solar
Solar is a battery charger, nothing more. When your RV is not powered by shore power the batteries are doing all of the work via your inverter and supplying the power as configured. Most of our motorhomes come with outstanding generators such as the ONAN QD8000 in my Newmar Ventana. These generators are often under utilized and will serve the needs to power your motorhome or RV in the event there is no shore power. Depending on the inverter controller you have there are various settings you can take advantage of as to when the generator comes on and how long it runs. The generator also serves as a battery charger but also works to supply electricity in the same way shore power does. So if we have these generators why would we ever want solar? There are benefits of solar such as not burning fuel to run a generator or making noise in a peaceful camping situation. Other scenarios include blending shore power with solar such as when I was recently at a 30 AMP campground I could use shore power to supply my air conditioners and solar to provide the source of power for all inverter supplied loads. An additional scenario is keeping your batteries charged when in storage or in for service. Advanced coaches these days have such high electrical loads then sitting in a service lot such as Cummins when not connected to shore power will kill your batteries if not disconnected and may damage your batteries requiring you to replace all of your house batteries which could be near half the cost of a solar install. Another scenario for solar which I'll be using in a few weeks is a long term stay at a campground that charges for electricity. I'll have my MH setup so that solar supplies all of my electrical demands until the batteries get to a certain percentage of charge and then shore power will come online if solar is not doing the job. So there are many reasons for solar and the amount of solar installed depends on your usage scenarios. If just keeping batteries charged while in storage you could require fewer panels such as just two panels on the roof. If you want to keep your refer on such as was one of my requirements for solar before I moved to a storage facility with shore power it was determined I needed a minimum of 1440W of solar.
What is involved in installing Solar
Believe it or not solar is not complicated. You can do it yourself as I did mine as long as you are educated and/or coached by someone else that has done it. You can have it professionally installed as well and I highly recommend AMSolar.com as they were very helpful at the time of my solar setup in determining minimum loads for my demands, what hardware to buy, etc. If you can get on your roof you can do this yourself, it's best to have someone help you even though I did mine solo. Getting the panels on the roof is the hardest part. As with everything these days YouTube is a great resource for learning something prior to doing it. Search YouTube for your topics of interest and get educated. AMSolar has great videos as well which I watched prior to my install.
Solar from top to bottom starts with the panels. You can get panels of various sizes based on your needs and available space. You'll want to design a layout so that you can still walk on your roof as needed. You can get solar panels from various supplies from AMSolar.com to Home Depot, etc. In fact you can get refurb or blemished ones from AMSolar I later learned when I needed two more and save quite a bit of money so don't hesitate to ask about that if you're okay with it. They still work the same but may have a scratch on the glass that prevents them from being sold as new. In the configuration @Chuggs designed to go against a MPPT type solar charger he designed the setup so that two solar panels were paired together to increase the voltage going to the solar charger effectively doubling it by putting the two panels in a series configuration. Each pair of panels then gets wired into what is called a combiner box which sits right on top of the area where your RV manufacturer left the ends of the wires underneath your roof. In the case of Newmar they put a metal plate over top of the area where the two wires should be. Keyword "should be". Cut carefully into the roof below this panel only large enough as needed to start looking for these wires. Don't go too deep either only cutting through the thickness needed to get through the roof material, there was a duct below my location. The two wires were about 6 inches offset from where Newmar indicated they would be, I then pulled them up and connected them to the combiner box. Each pair of panels is also connected to this combiner box and then you're essentially done on the roof after mounting the panels per the guidance of your solar coach or manufacturer. In my case it was simply a matter of cleaning the fiberglass with a mild abrasive scotchbrite pad, then 91% ISO alcohol, then adding 3M primer and using the adhesive mounts to attach to the fiberglass roof. You can also screw them down if needed but it's not necessary. Then add dicor around the mounts to keep the elements from breaking down the adhesive connection.
Now that the roof is done and the panels are attached to the roof and the wires are connected to the combiner box the power is now ready to be connected below. Obviously you want to protect the ends of your solar prep 6 AWG wires as you now have electricity flowing. I mounted all of my solar components to a board and then screwed the board to the sidewall of the basement. A mistake I made was the location of this install. I elected to install between the chassis rails and as I later got HWH Active Air installed it interfered with the location where the leveler sensor should have been mounted. With that said consider mounting your solar components near the basement door i.e. not between the chassis rails.
My coach has a Magnum 2812 inverter. Some choose to remain with Magnum components such as the PT100 but @Chuggs made a great decision to go with someone a little more cutting edge with bluetooth functionality, the ability to easily update the firmware, and an array of other components that all play well together. Per @Chuggs I went with a Victron Energy MPPT 150|100-tr solar charger. In the image below you can see this "blue box" but let's follow the flow of voltage. As you can see with the red arrow the positive from the roof is coming into a catastrophic fuse that will protect the components such as a voltage spike, lighting strike, etc. This cable then goes into the charge controller. The negative comes into the black power cutoff switch and into the charger controller allowing you to isolate (cutoff) the power flow from the roof panels if you need to such as doing some work on the solar charge controller or simply turning off your roof panels. The blue arrow indicates the flow which is going from the solar charge controller to the battery bank I believe using a 2 AWG cable and going through another cutoff switch to cut power to the charge controller and stop the flow to the battery bank. As you can see this is a very simple setup, nothing cosmic here, this is solar!
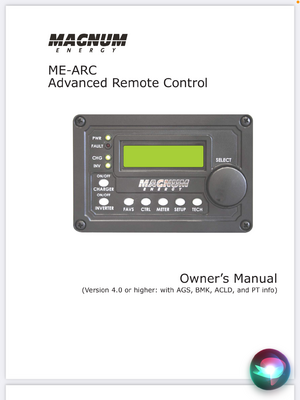
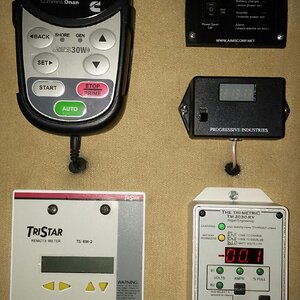
A few additional components are involved to improve the entire battery charging experience. As you can see in the photo below with the solar charge controller on the left side is a Magnum Battery Monitor Kit (ME-BMK) which measures the electricity flow through a shunt. Installing this shunt is a little complex in that you need to know how to install this carefully so as not to damage your inverter. Follow the instructions, research the web, or have a professional install it. The ME-BMK works well with the improved Magnum control head called the ME-ARC50 (A is for advanced, i.e. advanced controller) which works better with solar (PT100) and BMK components networked together. As some of us elected to go the Victron Energy path we opted to also add a battery monitor that the Victron system can use which is the BMV-712. The BMV shunt can be shared by the ME-BMK so you can have a single shunt in use that provides the information to the solar setup and also the Magnum control head. The BMV-712 also has a battery temperature sensor you can buy so the solar system can do automatic compensation based on battery temps such as in extreme hot or cold locations. Another item we added is the Venus GX which is a networking controller that provides data to the free Victron Energy Remote Management cloud portal (VRM). This allows you to view your solar data from anywhere using a computer or smartphone but also to configure alerts such as if your batteries go below a certain charge state, etc. You can also add a temperature sensor to the Venus GX to monitor items such as I use it to monitor my wet bay temperature and have alarms should the temp get below a certain point.
Conclusion
Solar is a great way to really learn the electrics of your RV/motorhome but also as described above to avoid being in situations where your batteries can be damaged by not being properly charged when out of your control. You'll better understand your house batteries and their capabilities, your inverter, and your shore power and how all this comes together to provide the needed electricity for your coaches demands. In addition if you decide to add MicroAir Soft Start units to your air conditioners as some of us have done and do a little more electrical work you can actually run an AC off of solar which is cool. That's for another discussion.
I've seen some great solar installs and learned so much from others on forums such as this. Several have even gone the lithium route and if you ever cross paths with @10 fan you should look at his lithium and solar setup where he installed two PT100 charge controllers and has both legs of his power supplied by solar allowing him to do anything that you can do with shore power. Amazing! Impressive install and design!
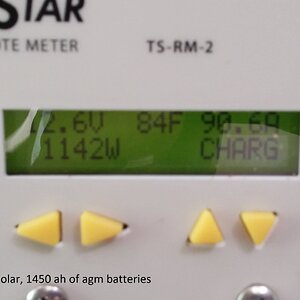
Feel free to ask any questions but again this is really designed to be an intro to solar with some usage scenarios but also not to be intimidated by solar as it can be a great asset to have on your RV. It is amazing how much power you can draw from the sun, with my 1800W setup (10 x 180W panels) I can easily sustain 100A of power from the roof which is the limit of my solar charge controller.
Victron Energy | Independent energy systems engineered to outlast
Energy systems for autonomy and customisation—off-grid, mobile, or stationary—built on a connected ecosystem. Trusted by professionals. Proven over 50 years.www.victronenergy.com
Thank you for this informative Solar 101 discussion. I own a 2017 Ventana as well although mine is a 3709 model. I'd guess I have a little less room for roof panels but all I really need to do is run my Whirlpool residential size fridge which I'll bet is the same one as yours. We summer at 9200 feet in the Rockies so A/C is not needed.
I will be following your advice and gaining some basic knowledge before I jump in. Anything else you'd like to share would be most welcomed.
Laurent Perron aka notsotallTexan
San Antonio, TX.


