Welcome to RVForums.com

  • Register now and join the discussion
  • Friendliest RV Community on the web
  • Modern site for PC's, Phones, Tablets - no 3rd party apps required
  • Ask questions, help others, review campgrounds
  • Get the most out of the RV Lifestyle
  • Invite everyone to RVForums.com and let's have fun
  • Commercial/Vendors welcome

All basement doors locked

Welcome to RVForums.com

  • Register now and join the discussion
  • Modern secure site, no 3rd party apps required
  • Invite your friends and let's have fun
  • Commercial/Vendors welcome
  • Friendliest RV community on the web
Jerry,
It is better to have it and not need it, than need it and not have it ?
 
I really don’t want to do this but you guys are making me feel like I really should
 
I'm working on mine. Did 9 doors, 5 to go. Can't believe we have 14 doors not counting the entry and both hatches:eek:. I tightened all the pull cables 2 years ago,now I found two of them loose, and one nut holding the latch bolt almost falling off. How I'm using green Locktite on the allen key screw and on the latch nuts. Plus replaced 2 failed actuators.
Will document all that and post it.
BTW Tried to open the generator hatch. It was not lifting at all??? Started forcing it gradually until I can see that the support metal bar that holds the hatch when lifted has fallen down and hooked into something. It took me more than an hour pulling hard and bending it thru the gap and got it released. The little plastic snap holder is failing, and I have to come up with a solution? I think they designed that thing wrong. The bar should be attached to the lower part, and lifted to the hatch when open. Like they do it on the cars.
 
OK, now some pics of your release system please? Belonging to RV, Harley, and Jeep forums is keeping me pretty busy...
 
Here is an idea what I did:
Bought on Amazon Nylon coated stainless steel wire 45 lb test: Fishing wire
Crimp sleeves for the same wire: Crimps
Also you can use blue Locktite, but I needed it anyway and got the Green wicking kind: Green Locktite
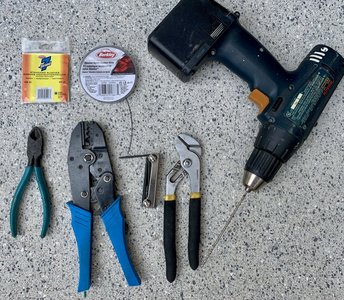
Below is photo of the tools I used. Screwdriver is not shown:

hJE%IBtFSr6mTP5xBttdeQ_thumb_131a.jpg

Start by removing the plastic cover
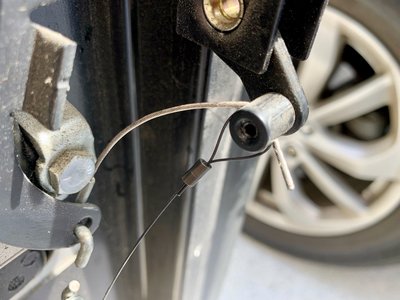
* Loosen the allen screw holding the wire just enough to insert the wire, but careful not to drop the screw.
* Make a small loop and crimp it. I used my electrical ratcheting crimpers, but they sell crimpers that fisherman use for this kind of work? Use some Locktite before tightening.
I tightened mine 2 years ago, and so far found two loose. When there, check the rest of nots etc.
nR+2kR1DTRWlnTWIacB5Kw_thumb_131f.jpg

* Measure and cut the wire about 5" from the very bottom of the door.
* Use the drill with a long 1/8" drill bit or similar to drill hole thru the bottom of the aluminum frame directly (or close) below the top loop.
* Feed the wire thru it, and make another loop. Size does not matter.
* Make sure the wire is slack under the cover, so it does not tug on the latch.
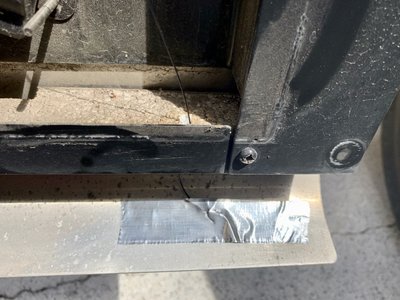
* I used aluminum tape to attach the hanging wire loop to the bottom of the door
+solWb7oRauTyerAllK0MQ_thumb_131e.jpg

The wire when pulled will over ride everything and release the latch. All you have to do is release the bottom loop, and pull straight down.
Hope I did not forget any details, but ask if you have any questions.

pa1yMtwySDauj7sBvSk9rA_thumb_131d.jpg
 
Thank you! I'll be doing this very soon. Parts on order.
 
Did pretty much
Here is an idea what I did:
Bought on Amazon Nylon coated stainless steel wire 45 lb test: Fishing wire
Crimp sleeves for the same wire: Crimps
Also you can use blue Locktite, but I needed it anyway and got the Green wicking kind: Green Locktite
Below is photo of the tools I used. Screwdriver is not shown:

View attachment 5962

Start by removing the plastic cover
* Loosen the allen screw holding the wire just enough to insert the wire, but careful not to drop the screw.
* Make a small loop and crimp it. I used my electrical ratcheting crimpers, but they sell crimpers that fisherman use for this kind of work? Use some Locktite before tightening.
I tightened mine 2 years ago, and so far found two loose. When there, check the rest of nots etc.
View attachment 5961

* Measure and cut the wire about 5" from the very bottom of the door.
* Use the drill with a long 1/8" drill bit or similar to drill hole thru the bottom of the aluminum frame directly (or close) below the top loop.
* Feed the wire thru it, and make another loop. Size does not matter.
* Make sure the wire is slack under the cover, so it does not tug on the latch.
* I used aluminum tape to attach the hanging wire loop to the bottom of the door
View attachment 5963

The wire when pulled will over ride everything and release the latch. All you have to do is release the bottom loop, and pull straight down.
Hope I did not forget any details, but ask if you have any questions.

View attachment 5964

Pretty much did the same thing but utilized thin gauge electric wire, wrapped it around the arm of the latch and taped with duct tape above. Did all but the DEF and Battery doors.
 
Got to a "what do I need to do next" time in our travels today so I did cables on all the doors. Just got into the rhythm of doing it on the last one... Thanks for the tip on this!
 
Ok, when I fixed my latch, which is what broke. I was thinking about sleeving the wire inside that screw down allen head screw. It would make the wire more resistant to failure, it might not allow enough movement however. It was tight when went to fix latch. I now, slowely close all storage doors. They all seem to work for me. Good idea on external wire/latch open idea, just going to monitor mine.
 
Thinking of seeing if there is enough wire at the end to just add a lrge crimp cap of some sort. And no longer slam doors. Thanks to Buly. Good arm exercise pushing them in to secure.
 

Latest resources

Back
Top